
The AI-Assisted Engineering Workflow I Use Day to Day
How I structure intake, slicing, TDD, implementation, review gates, system validation, and sign-off when working with Claude, Codex, and coding agents in production engineering work.

The bad version of AI-assisted engineering looks productive for about twenty minutes.
I’ve been meaning to write this article for a while because the way I use AI coding agents today looks very different from how I started.
Over the past year, I have used Claude and Codex heavily in day-to-day engineering work. Some of that has been genuinely useful, but it has also been frustrating. Agents can write good code, but the work around the code was too loose.
When there’s too much room to interpret the requirement, things can go sideways.
That is what changed my thinking.
Instead of thinking about writing better code, I think now about, “What gives the model the right boundaries, the right context, and the right review path?” Some engineers have started calling this loop engineering. I think that is directionally right. In practice, I think of it more simply as a controlled engineering workflow around the agent runtime.
Similar to how Context Engineering came up to optimize what gets sent to the agent, Loop Engineering aims one layer above that: how the work enters, how it gets decomposed, how the test story is defined, how implementation stays bounded, how reviews are done, and how broader validation happens before merging the PR.
This article is about that workflow.
It is the AI-assisted engineering process I use day to day: intake, slicing, TDD, implementation, review gates, system validation, and sign-off.
All while keeping myself in the loop across stages.
What are Coding Agents doing right?
Claude Code, Codex, and OpenCode are all harnesses. A coding harness is the software layer around the model that manages the agent loop, memory, tools and their execution, caching, and more.
Current harnesses all converge on the same basic capabilities: navigation, multi-file editing, terminal execution, tool calls, and third-party integrations. Today, in the context of coding, when using LLMs, this layer shapes most of the user experience compared to prompting the model directly.
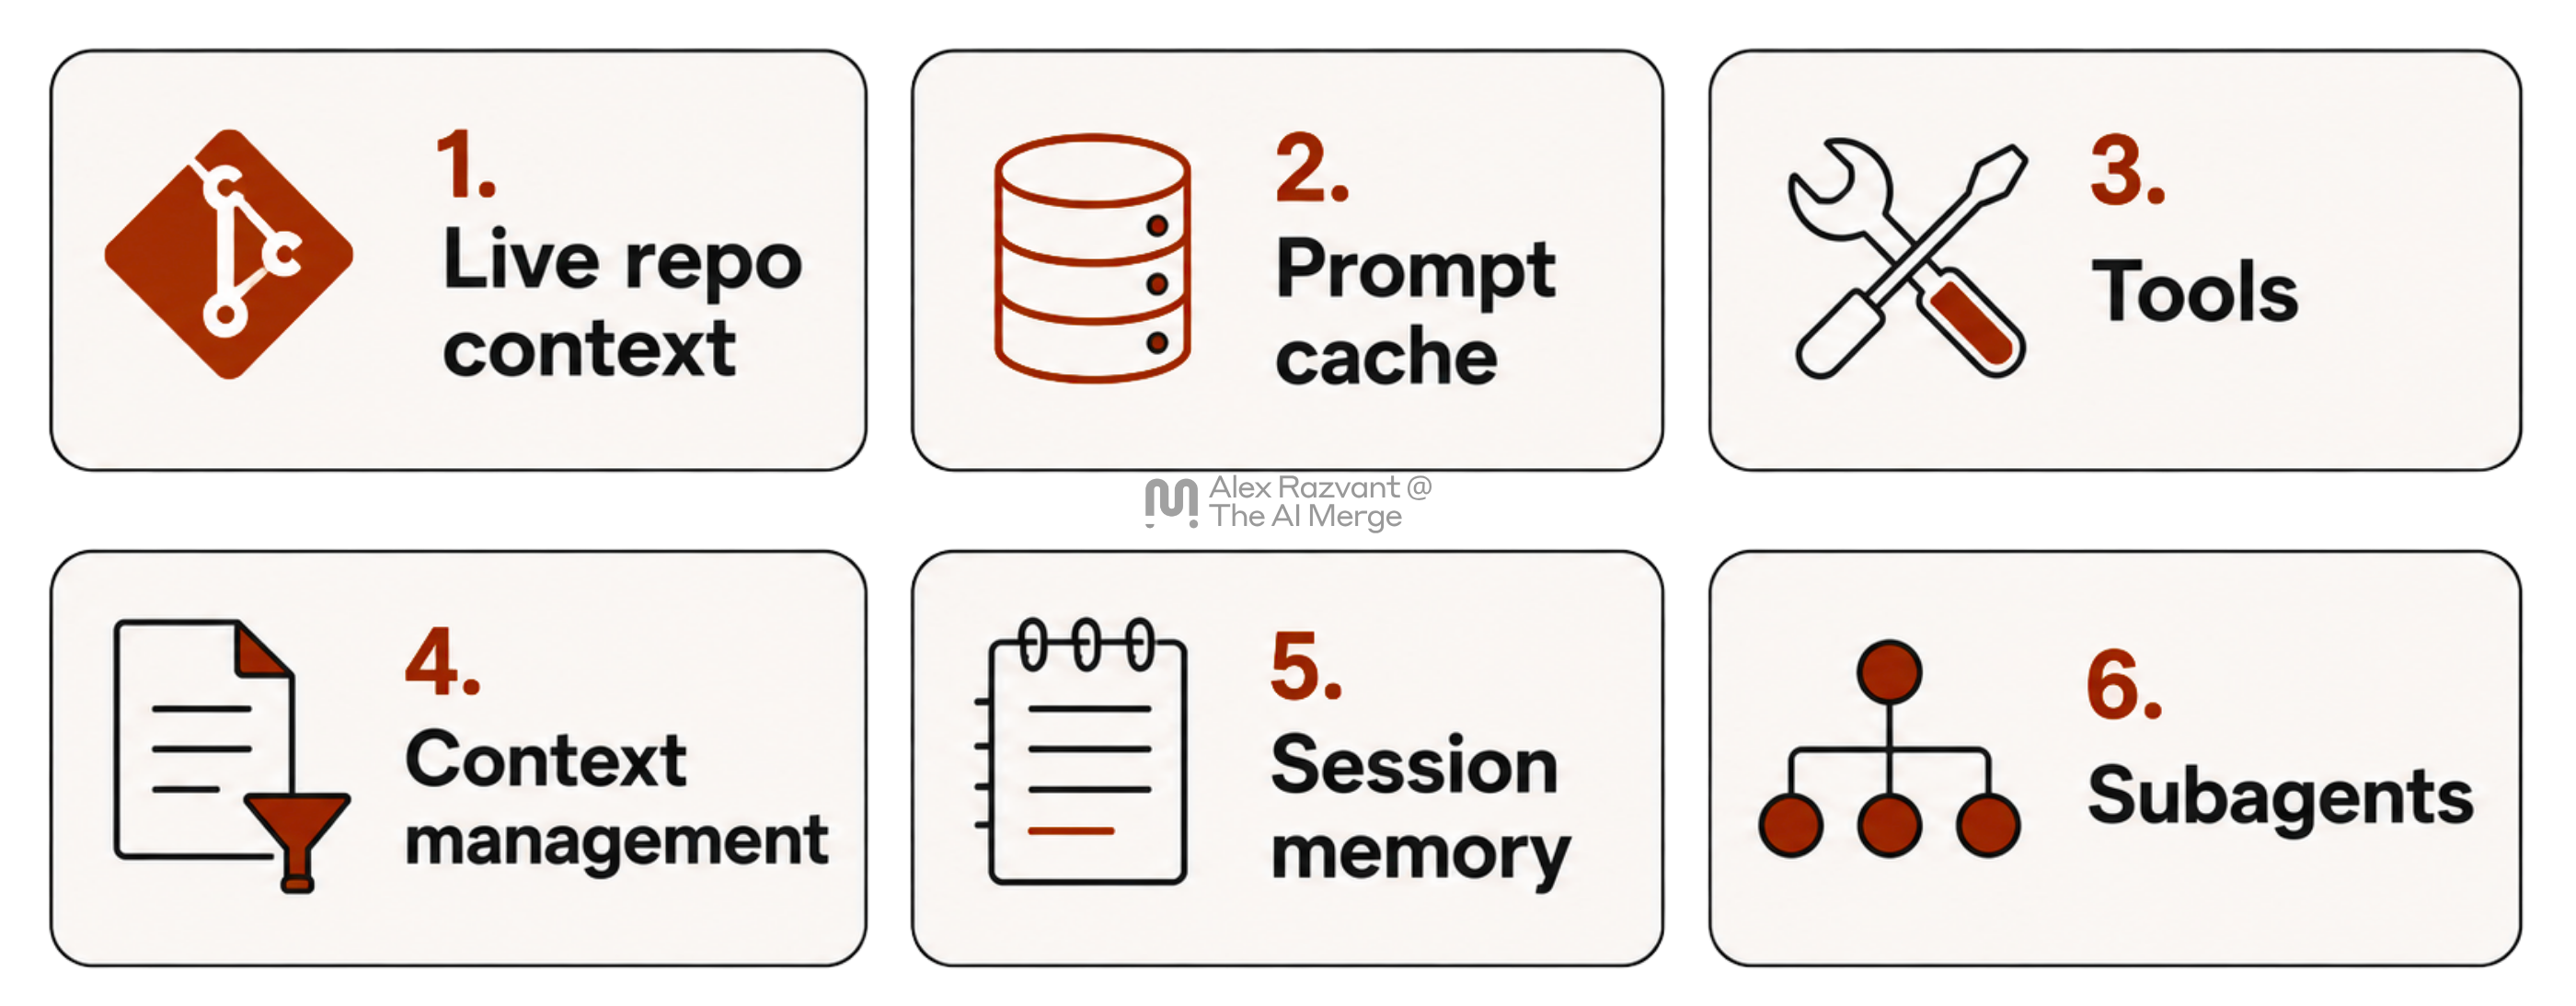
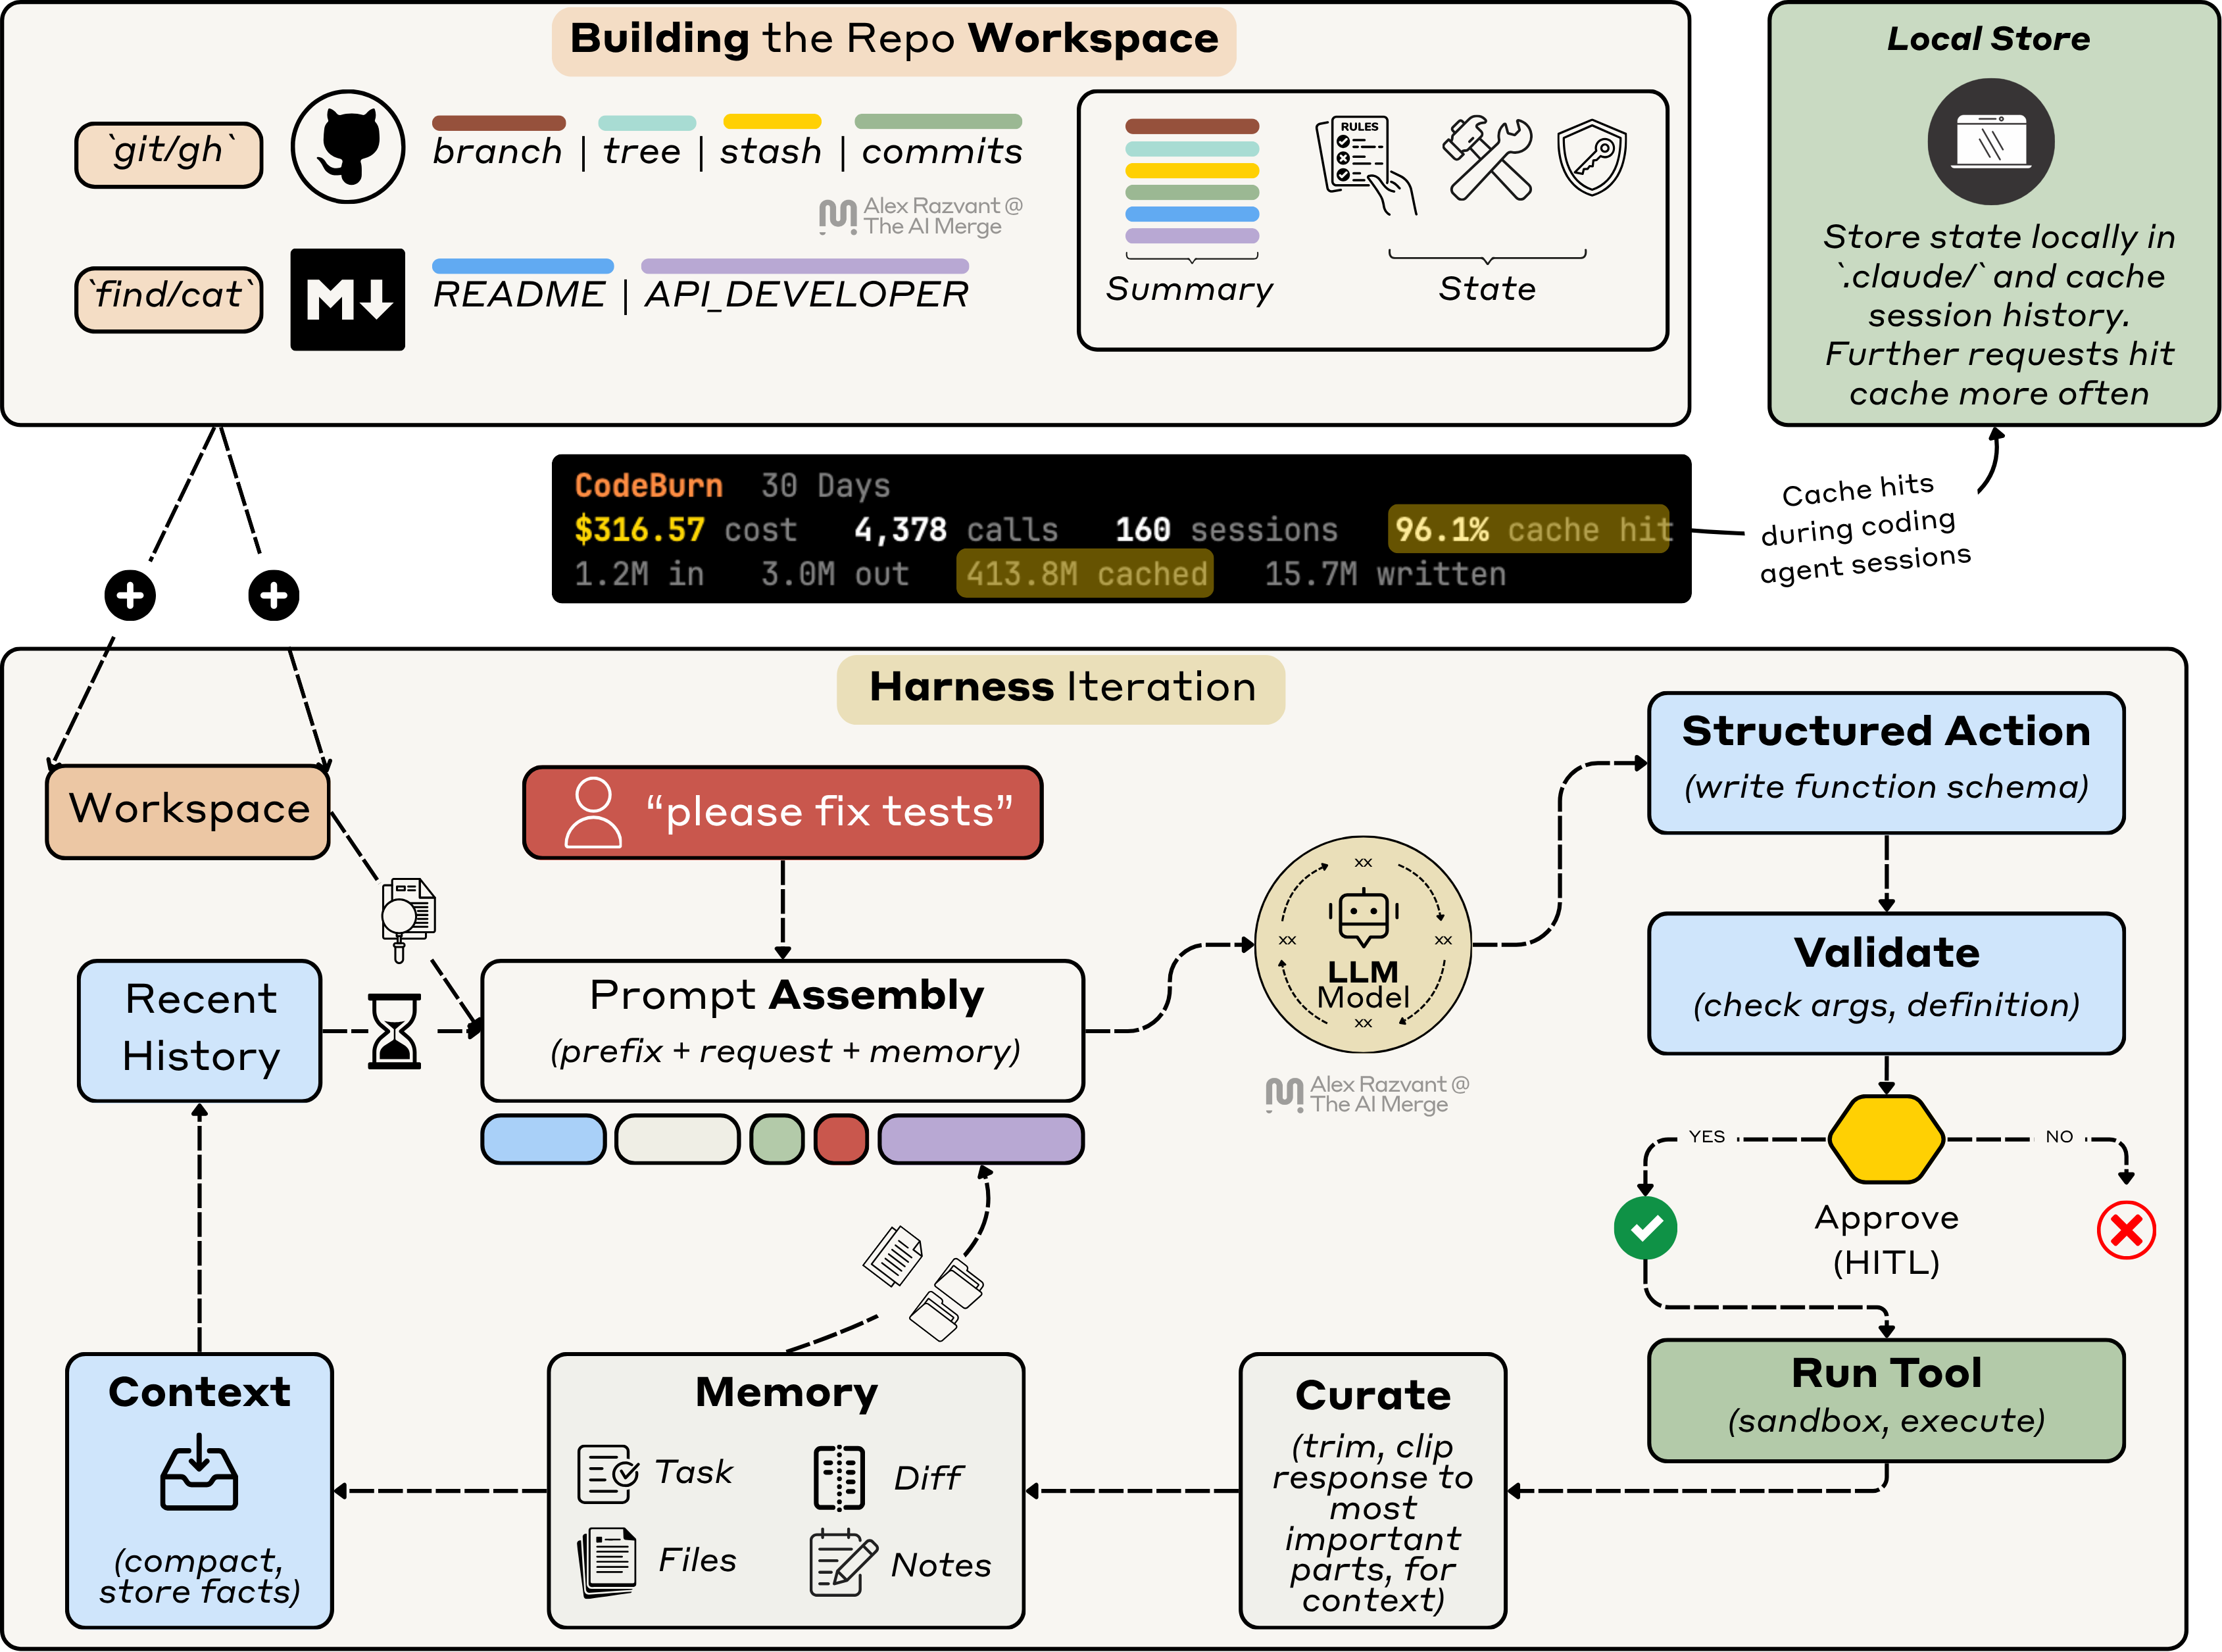
Agents are great at navigating and parsing information. Whenever setting up Claude or Codex in a new codebase, one of the first things it’ll do is prepare the context of the codebase it’s spawned in.
Building the Workspace
If you open Claude Code in a new repo, it’ll ask you to write the CLAUDE.md for you, where it might spawn sub-agents to scan the repo, prepare the structure, and generate an initial state of the language used, architecture, services and producers, and consumers of the service.
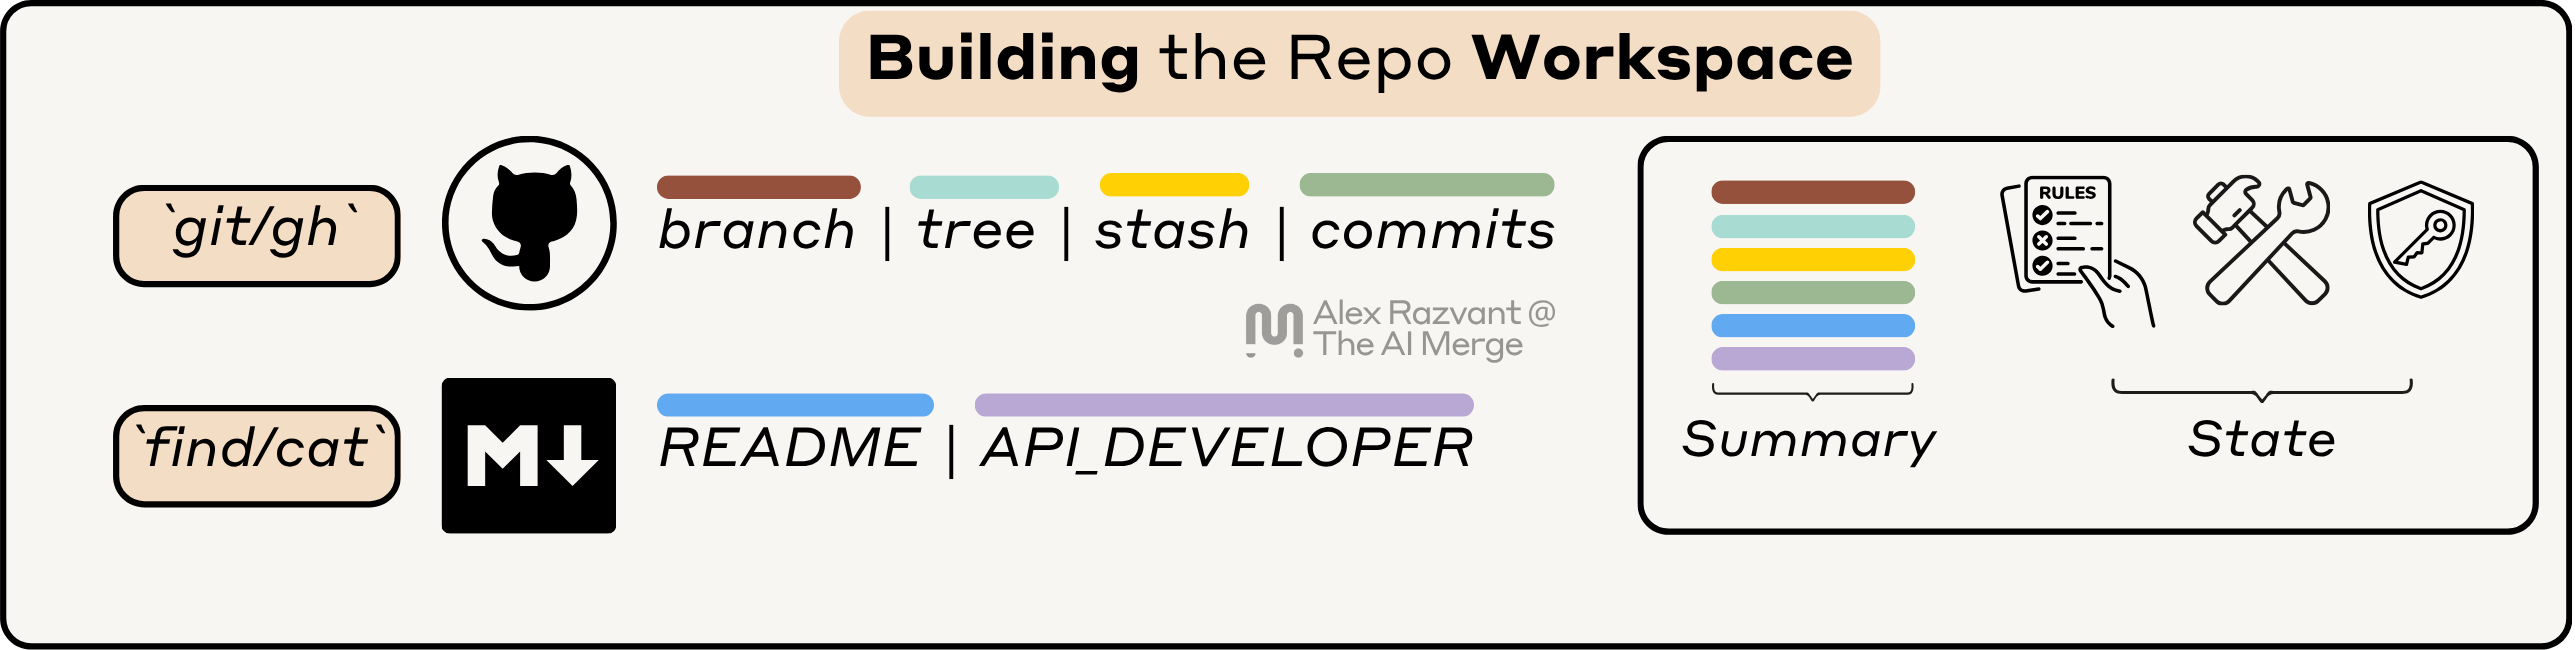
Saving Snapshots
Further, after that stage, it’ll also create a local entry on your system to store the state of any session you might open or resume in that codebase.

Caching and Reusing Sessions
The snapshots it creates will usually stay in Markdown or JSONL files that Claude creates on its own, and will be further used on your next sessions as a cache layer, and as cached context for your current or next sessions you’re working in.
With Claude or Codex, you can resume a previous session you’ve had open at a specific path on your local system. By invoking:claude --resume 05788498-2682-4b62-b1d2-e85f3565894bClaude will load the session, the conversation history, and cached prompts, allowing you to continue right from where you’ve left off.
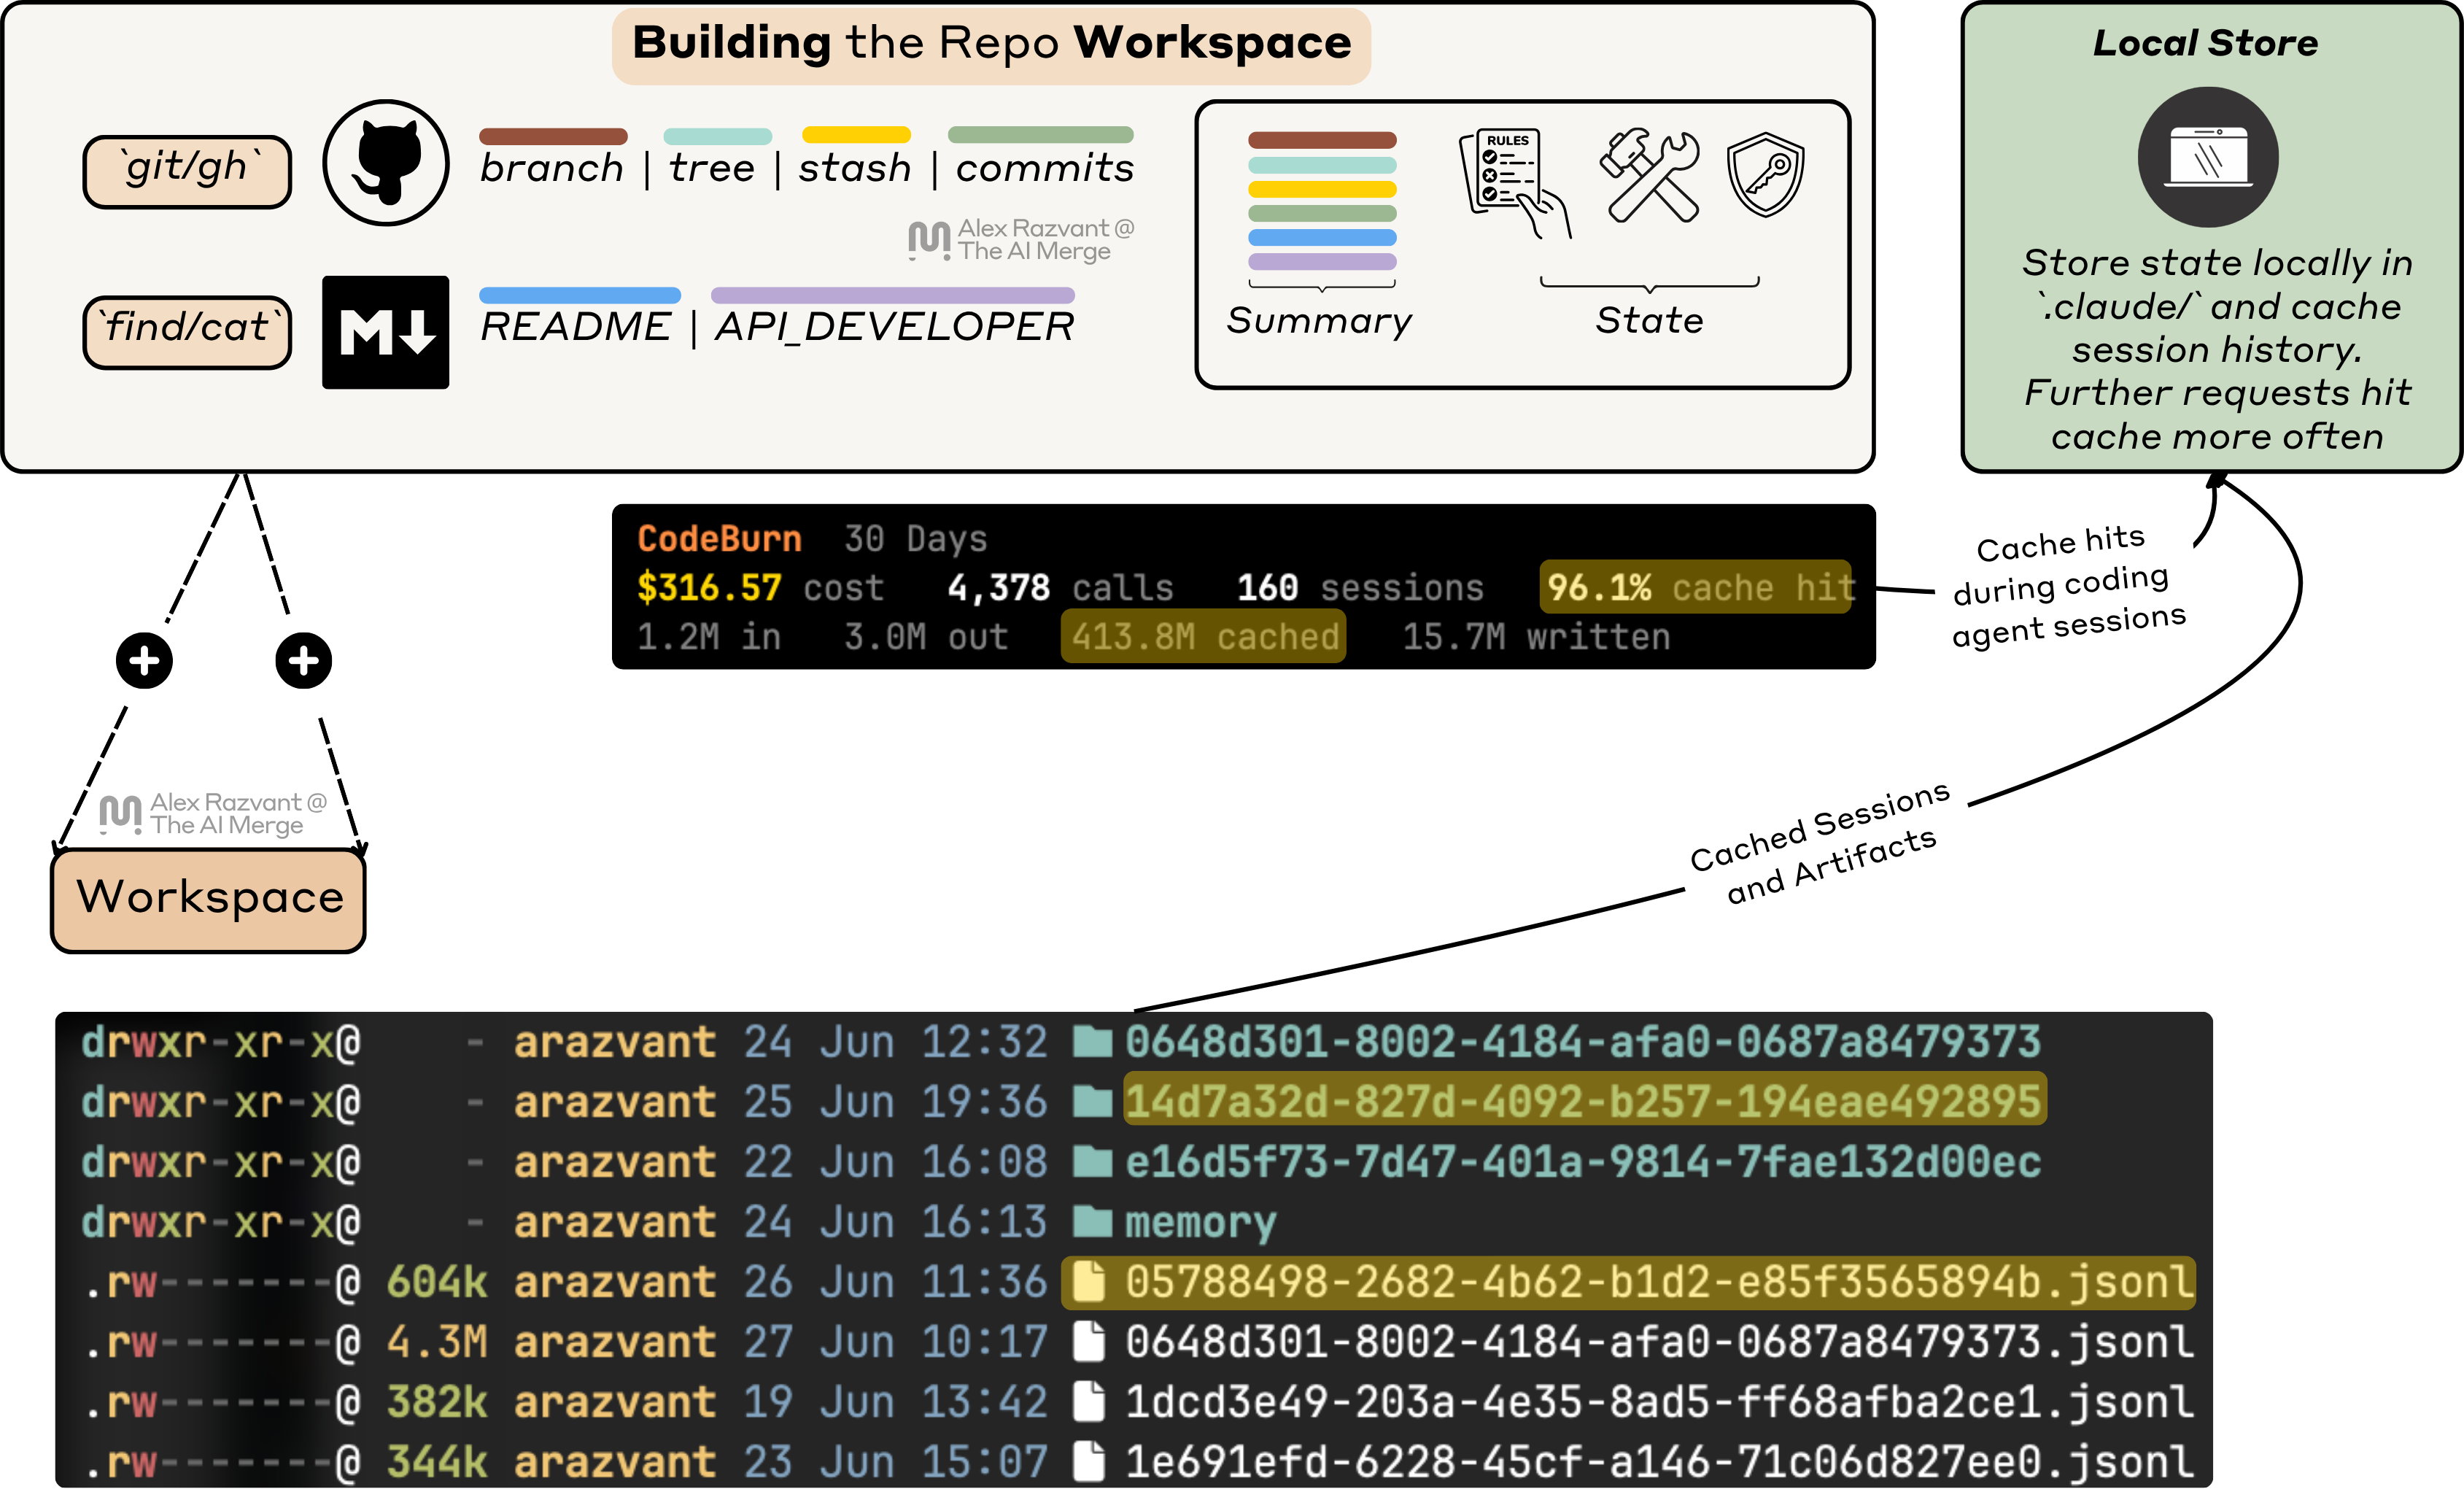
./claude it stores memory files, global and procedural, as well as the conversation history in JSONL files.The Internal Workflow
In a harness iteration, you prompt Claude, and before your message hits the Claude API, it composes its context from the workspace, recent history, loaded skills, definitions of MCP functions, or diffs - before an API call is made.
With every conversation turn you have with the Agent, it’ll build on top of existing scope. The Agent doesn’t know about the features, tests, or integrations you want to build next.
The behaviour still looks like “chat” with the agent on top of your codebase. A smarter chat, but still far from a controlled software engineering workflow.
Adding those controlled steps is the engineer’s responsibility.
1. Adding the Engineering Layers
Once the agent has an understanding of your repo, you can work on adding layers that you control. The first thing these layers must do is ensure how the context of new work gets distilled into the existing knowledge. These are known as Agent Skills, which are, in essence, Markdown files, to guide the Agent on how to do certain things when working in the repo.
But I’ll go one layer on top of that. Combining development stages.
The actual leverage comes from everything around the coding harness surface. The way you route tasks, define PRDs and specific rules, or select different model tiers, all these will have an impact on your development workflow.
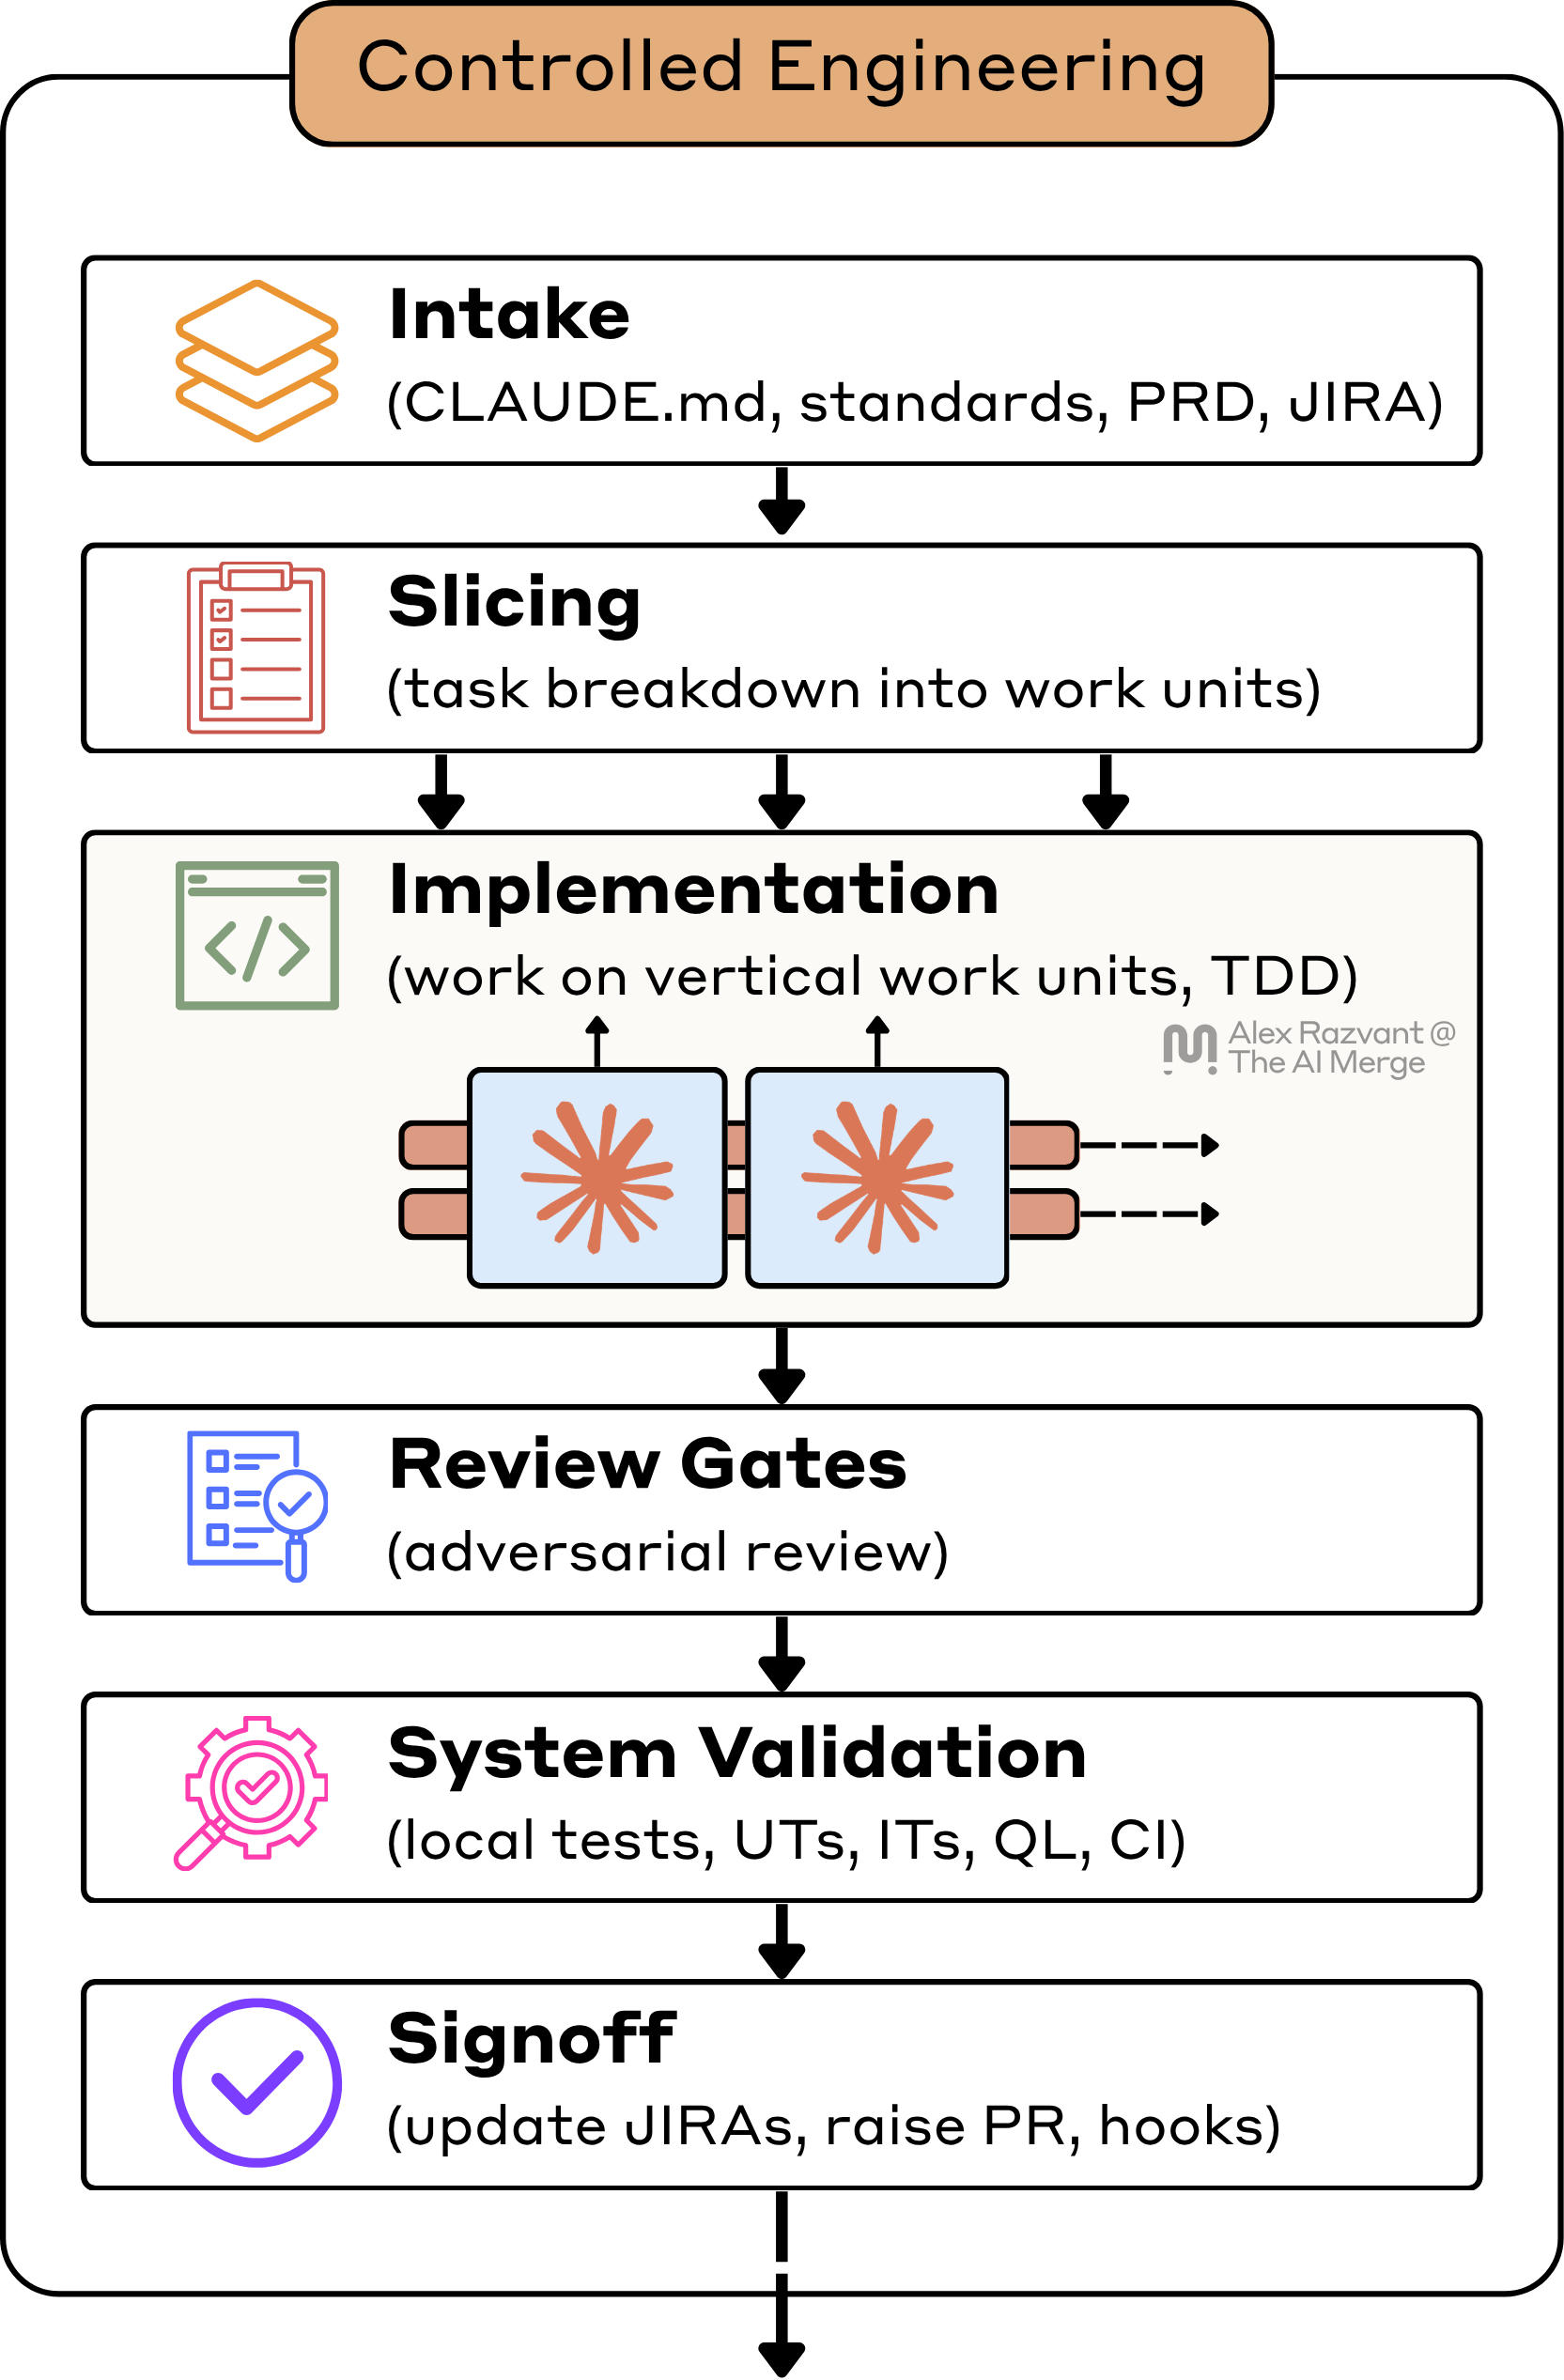
1. The Intake Path
I start by building the execution context, not by asking the agent to write code.
For this stage, I’m using the mid-tier models Sonnet 4.6 sub-agents, default context size.
I want the agent to enter the problem through the same control points I would use if I were assigning the work to myself or another senior engineer.
My intake layer pulls together the work item, the PRD if one exists, the design-doc handoff, repo standards, and any repo-specific guidance that materially affects implementation.
What matters is that the agent doesn’t have to invent from fragments.
If the agent starts with weak context, every later stage gets more expensive. Slicing gets worse because the requirement is fuzzy. Implementation gets noisier because the agent is rediscovering repo constraints during execution. Review gets harder because I am trying to determine whether the work was implemented badly or defined badly.
So before implementation exists at all, I want intake to answer a few basic questions. What exactly is changing. What standards constrain the change. What repo patterns are already established. What adjacent contracts are at risk. What evidence will later prove that the work is done. If those answers are thin, I do not want the agent improvising.
I want the workflow to surface that ambiguity immediately.
2. Planning and Slicing + TDD Story
After intake, I move to slicing. This is one of the most important stages in the workflow.
For this stage, I’m using Opus 4.8 (1M) to process the intake and slice the tasks.
I do not want the work decomposed into fake layers. I do not want “backend first,” “frontend later,” “tests after” unless the system really demands that separation. Most of the time, that kind of decomposition makes agent work worse because it breaks delivery into fragments, and I end up spending more time looping and fixing around the boundaries than actually moving the feature forward.
I want vertical work units.
I know that is harder to structure, but it is still the right default. The behavior should be pinned down before the main implementation pass starts.
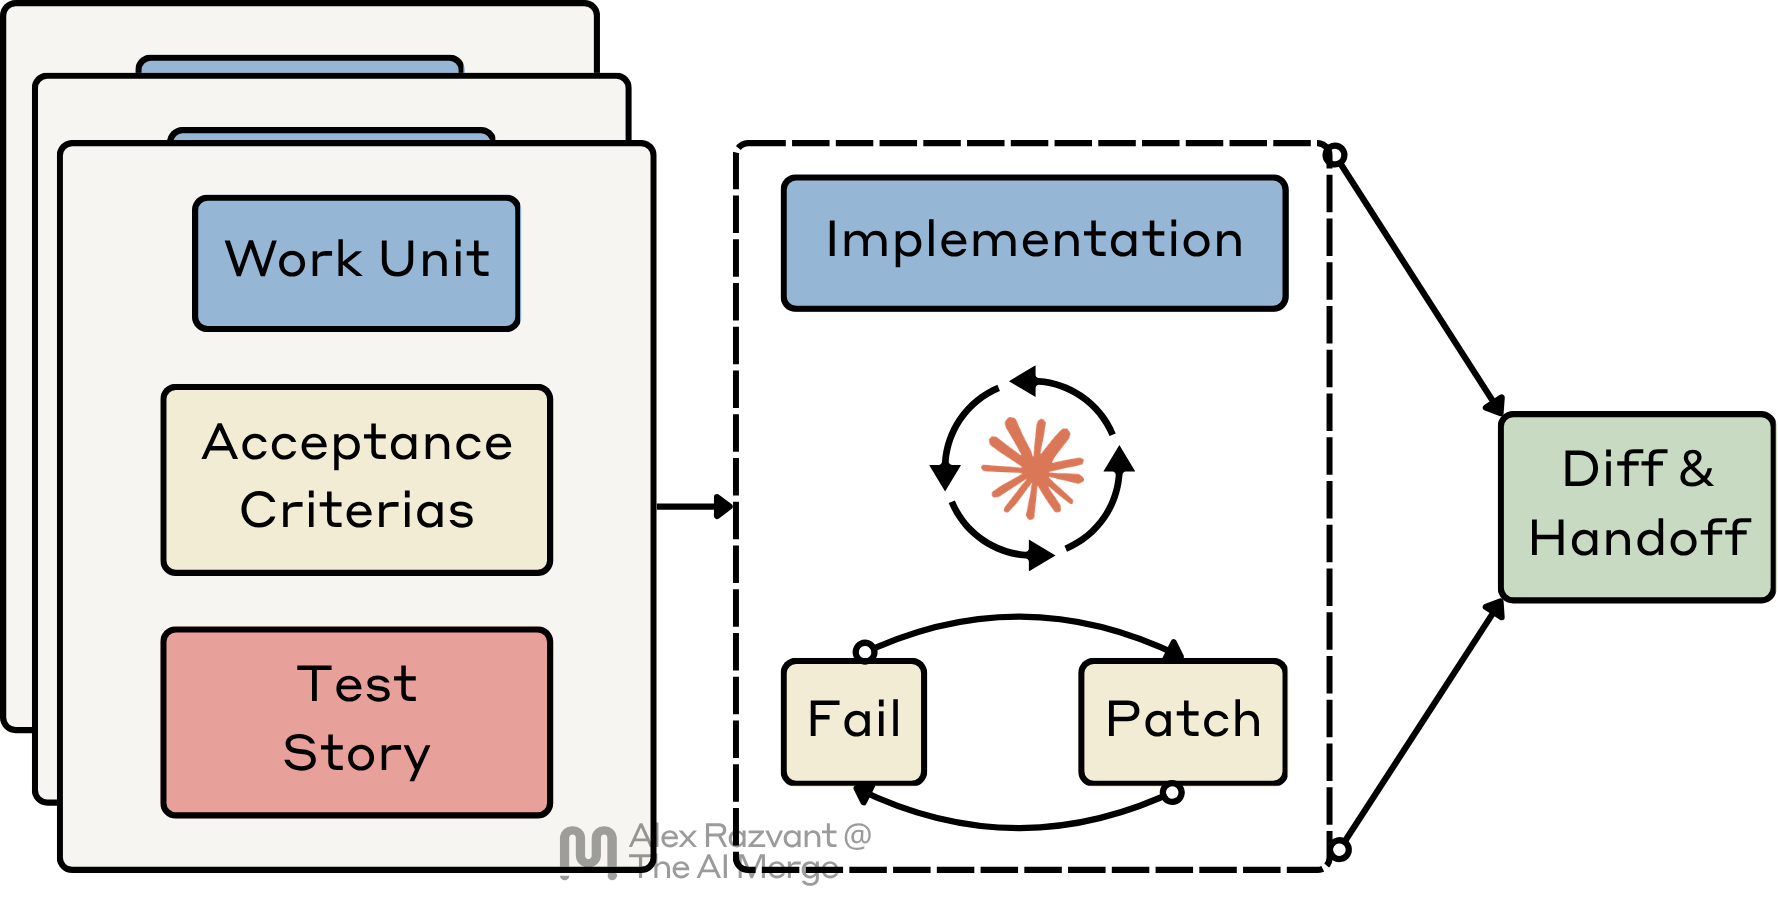
A work unit should map to a real increment of behavior. It should have a clear boundary, a definition of done, a plausible test story, and a scope small enough to review.
That means the test story gets defined during the slicing stage.
By the time a slice is ready, I should already know what failure looks like. I should know what turns the slice red, what green means, and which behaviors are non-negotiable before implementation starts. If the slice is good, I should already know what “red” and “green” look like. That keeps the work bounded.
This is also the first place where I stay very deliberately human-in-the-loop.
The agent can help surface ambiguity, boundary cases, and missing scenarios. It does not get to own decomposition. That is my job because decomposition shapes every downstream stage: implementation scope, test honesty, and review quality.
The output of this stage is a working artifact set: an updated PRD, a status map for work-unit progress, and one markdown file per task unit with scope, boundaries, and test story, all generated at the root level of where my projects reside.
With that, the agents do not need to guess what the work is supposed to be.
3. Implementation
During slicing, tasks are organized vertically. Implementation might need to define a new API stub, wire a database query, hit a backend route, or work on frontend components.
Because the slices are vertical and bounded, I can run multiple implementation agents in parallel without letting them invent their own scope. Each agent gets a work unit, a test story, a bounded file surface, and a handoff target.
For this stage, I’m using Sonnet 4.6 (like Anthropic recommends with Opus Plan)
Implementation starts by making the slice fail in a useful way, and then looping against it. That usually means a failing unit test, a failing contract case, or a narrow set of assertions that pin down the behavior before the patch exists.
That is where the TDD loop actually begins for me.
Once intake and slicing are done properly, and each slice is already bounded by a test story, implementation should become narrow. I also want implementation to produce the smallest truthful patch. Agents love to “improve” nearby code. I don’t want that.
Here, I care about a few things before I let agents run ahead.
First, the agent has to stay inside the slice. If left alone, it expands scope. They pull in adjacent files and keep bloating the implementation. I don’t want that. I want bounded execution against a bounded work unit.
Second, the runtime has to stay inspectable. I want to see diffs. I want to see commands. I want to see test output. I want the work visible enough so that I can determine whether the agent actually works in line with the assignment on the work unit.
Third, I want model routing to match task shape. Part of this is already done, as during the Slicing stage, the work units become quite clear on what files an agent has to touch, what it should work on, and what the handoff looks like.
Some people might prefer running this loop autonomously, and only inspect artifacts. For me, I like to keep an eye on it as this is my actual dashboard while I work. When I’m working in the implementation phase, I open multiple terminal panes and keep an eye on the agent’s progress, failing tests, diffs, and what handoff state they’re writing the whole time.
4. Review Gates
I do not use review gates to confirm that the agent “finished.” At this stage, I want to find out if there are any remaining gaps that I should address further.
For this stage, I’m using Sonnet and Opus, with different Subagent Personas.
For best results, Personas (e.g QA Engineer, Staff) should be codebase-aware, not generic.
That means I design the review gates to be adversarial.
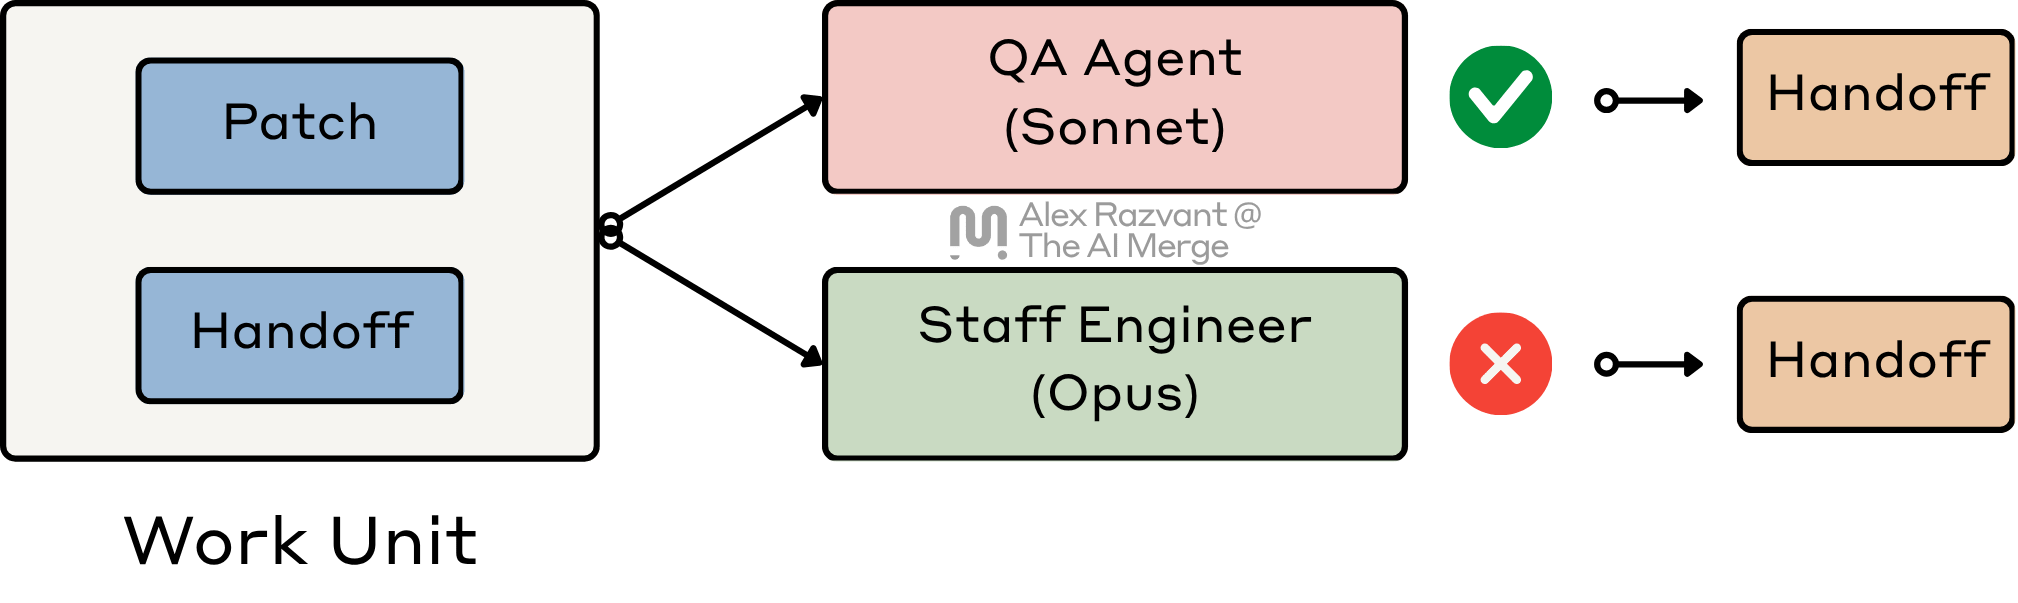
I do not want the reviewer agent behaving like a polite assistant or being too chatty. I intentionally design the Skills, Commands, and References for this stage to be concise and on topic and poke holes.
This is also the point where I read closely because this is where the workflow tells me what it thinks “done” means. If I do not like the review bar, I want to catch it here, not after a PR exists, and Copilot starts flagging and raising 50+ comments on my PR.
One critical aspect here is that the review gates (agents) will always start in a fresh session, and will get the context from the handoffs that each sub-agent has written.
I do not ask an agent to review its own work in the same session it implemented it. That session is already contaminated by its working memory, and the path it took to get the patch green.
A reviewer should not inherit the implementation session’s blind spots. It should start fresh, read the handoff, inspect the patch, and decide whether the slice, code, and evidence actually line up.
That is why I do not collapse review into the same agent loop.
If review fails the patch, I do not want an essay and then back to implementation. I want a short, precise handoff that names the exact gap. Those artifacts could easily transform into a second pass through the loop.
5. System Validation
By the time work gets here, the local TDD loop has already happened. I am no longer asking whether the slice can go green locally, but whether the completed change is safe and well-evidenced in the system it has to live in.
For this stage, I’m using Sonnet or Haiku.
Most of these checks are deterministic calls, best if they’re already pre-configured in your repo, with pnpm, make, go-task, or docker-compose to run part of your CI flows locally.
That is why I like to keep this as a distinct stage.
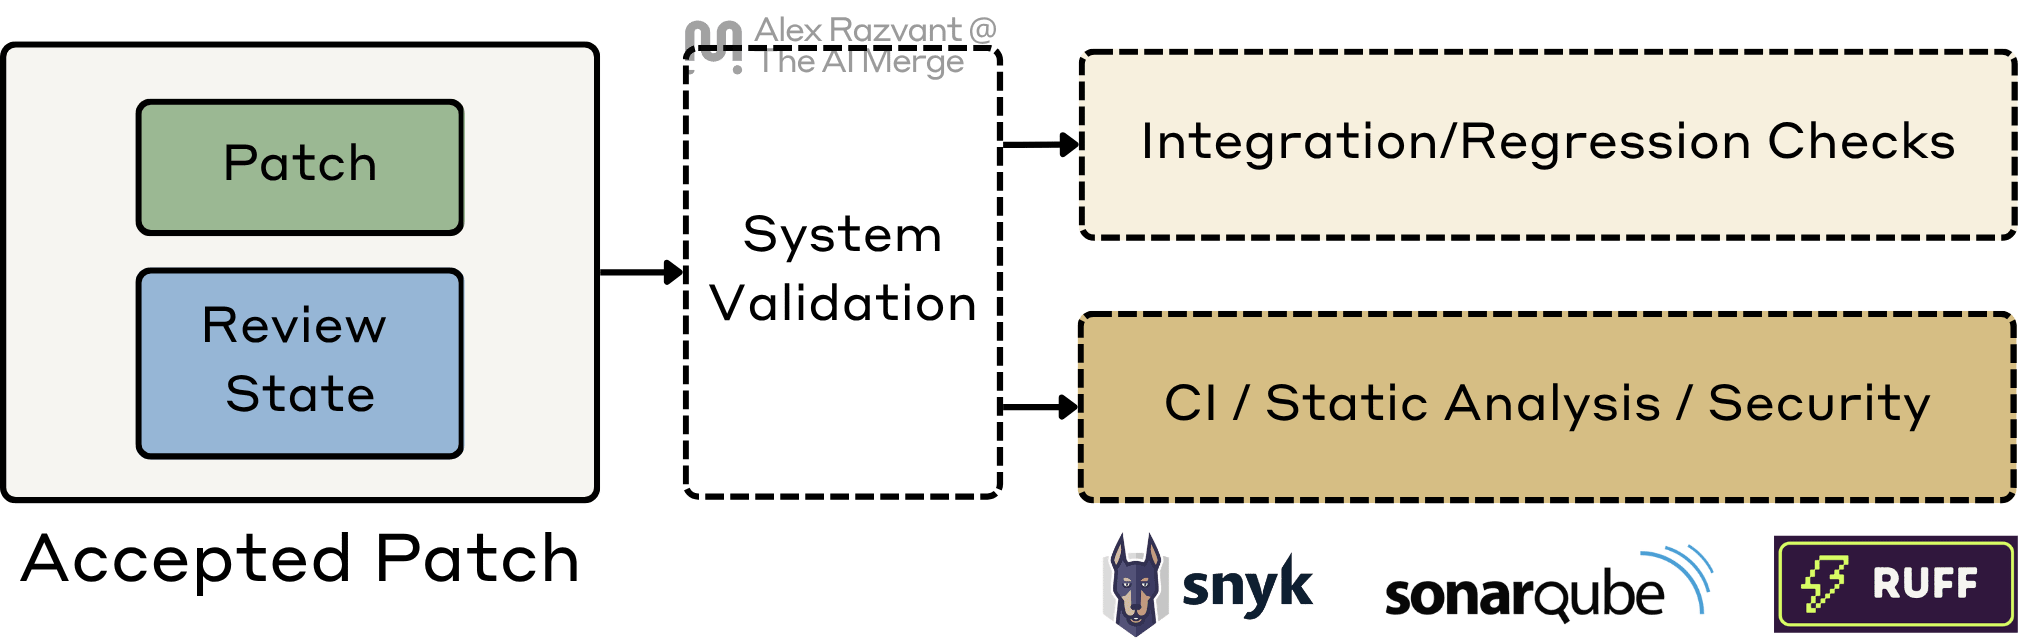
System validation is broader than the local implementation loop. This is where I want the wider evidence surface: integration tests, API checks and Schemas, regression tests, type checks, linting, static analysis, pre-commit hooks, security scanning, and whatever else the repo treats as normal engineering discipline.
The important distinction is this: TDD inside implementation proves the slice locally, whereas system validation proves the change at repo and service scope.
5. Signoff and Delivery Hygiene
Once system validation is clean, I move into signoff.
For this stage, I’m mostly deferring to lower-tier models like Haiku.
I do not need expensive reasoning here. I need consistency.
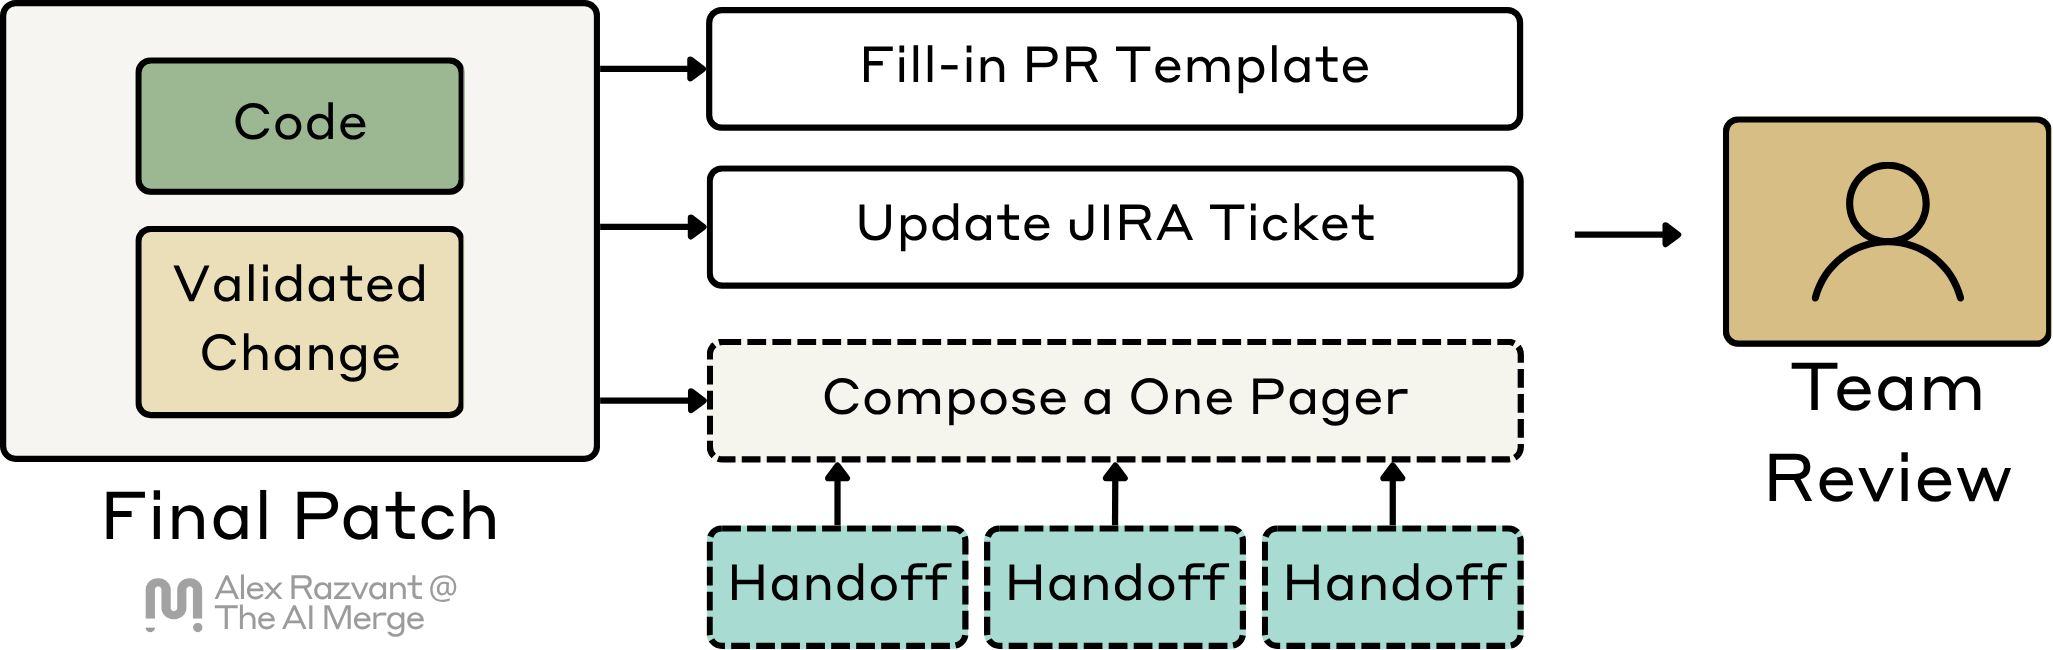
And usually in existing projects, there’s already a PR template, a test checklist, commit templates, pre-commit hooks, local CI checks, and others. Similar to the previous stage, most of the steps for signoff are already deterministic (think of Makefile, Taskfile) or scripts that are hooked into .pre-commit.yaml, for example.
The Agent’s job here is to package up the final artifact into something the rest of the team can consume normally: a PR, a clean summary, ticket updates, or a CHANGELOG entry.
It’s not implementation work anymore, more like paperwork.
The change should arrive with enough context that another engineer can quickly review it without reconstructing the entire agent session. The PR should explain the slice, the key files touched, how it was validated, and what risks remain. The ticket should reflect the real state of the work, etc.
This stage marks when the change enters the team’s normal workflow cleanly.
2. Tooling Recommendation
2.1 Let’s talk about the IDEs
Throughout my career, I have moved across a lot of IDEs.
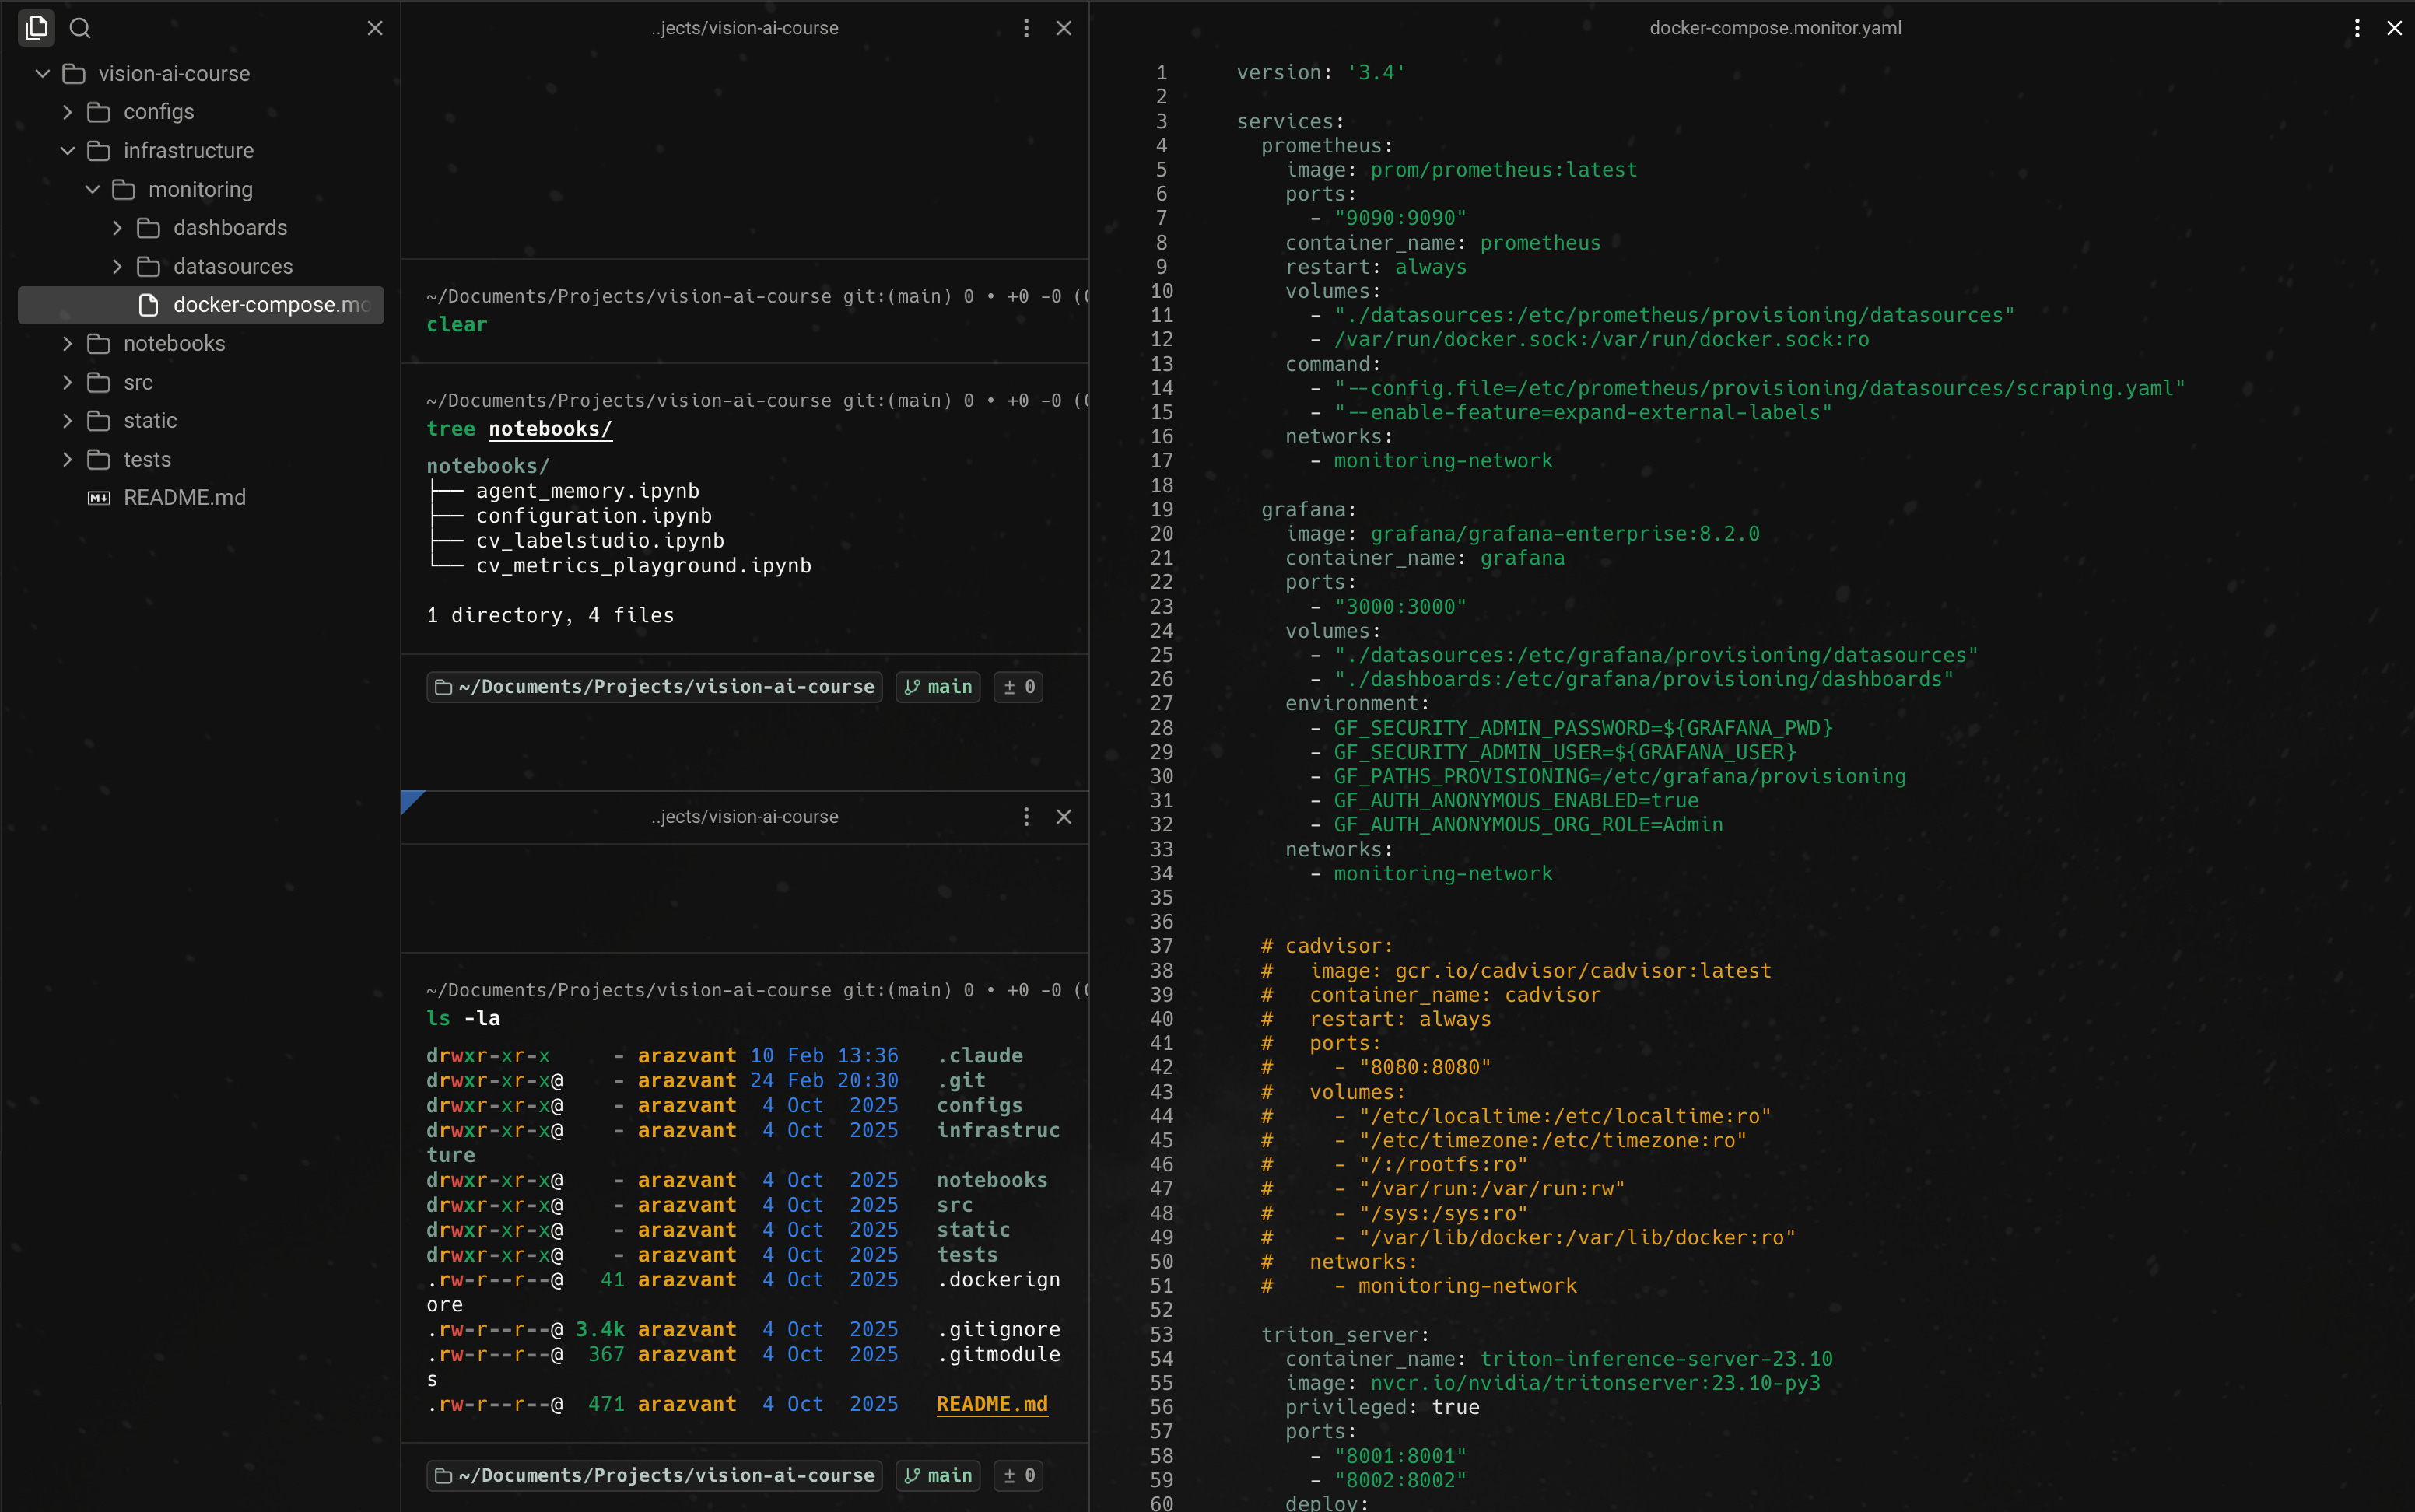
I started with JetBrains tools like WebStorm and PyCharm. Then I spent time in VS Code with Copilot. After that, I used Cursor more heavily. Over the past year, though, I have moved almost completely into a terminal-first workflow.
I’ve also worked with Zed and NeoVide for a bit, and once I’ve got confident with Vim, I switched to terminal-only. Here, I’ve been using Ghostty most of the time, but since Warp.dev went Open Source, I’ve never looked back.
2.2 Using Warp across the Stages
Here is how I use Warp across the six stages described above.
Intake Stage
At the intake stage, I usually keep the generated PRD or intake artifacts open as rendered Markdown in a left-side pane. In the center pane, I invoke the first stage and pass in the initial requirement, usually starting from a Jira ticket or an equivalent work item.
This gives me two things at once: the source requirement and the current execution context. I can read what the system produced without losing the terminal surface where I am actually driving the workflow.
Slicing Stage
During slicing, the setup stays similar.
I keep the central pane focused on invoking or steering the slicing stage, while the directory explorer lets me inspect the generated work-unit artifacts as they appear. At this point I am usually checking whether the slices are actually vertical, whether the test story is explicit enough, and whether the boundaries are tight enough for implementation to stay narrow later.
Implementation Stage
A vertical work unit will touch multiple repos.
Each pane becomes a live view into one part of the workflow: an implementation agent, a test run, a diff, or a second repo the slice depends on. This is not unattended. I want to see what commands the agent is running, what files it is touching, what failed, and whether it is staying inside the slice.
Review, Validation and Signoff
I use a similar navigation pattern here.
I keep the pane split, start fresh sessions where needed, and stay in the loop while the workflow moves from implementation to adversarial review, then into broader validation, and finally into PR and ticket hygiene.
I’ll occasionally go to Cursor whenever I need to check or manually fix a few things, but 90% of the time, I’ll stay in Warp and have multiple terminal panes open where I can trace the work agents are doing.
2.3 Monitoring Token Cost
I recommend installing CodeBurn.
I use both the CLI and the macOS app extension, and it has become my main cost-tracking dashboard. It gives me one place to track usage across Claude, Codex, Cursor, and the rest of the coding workflow.
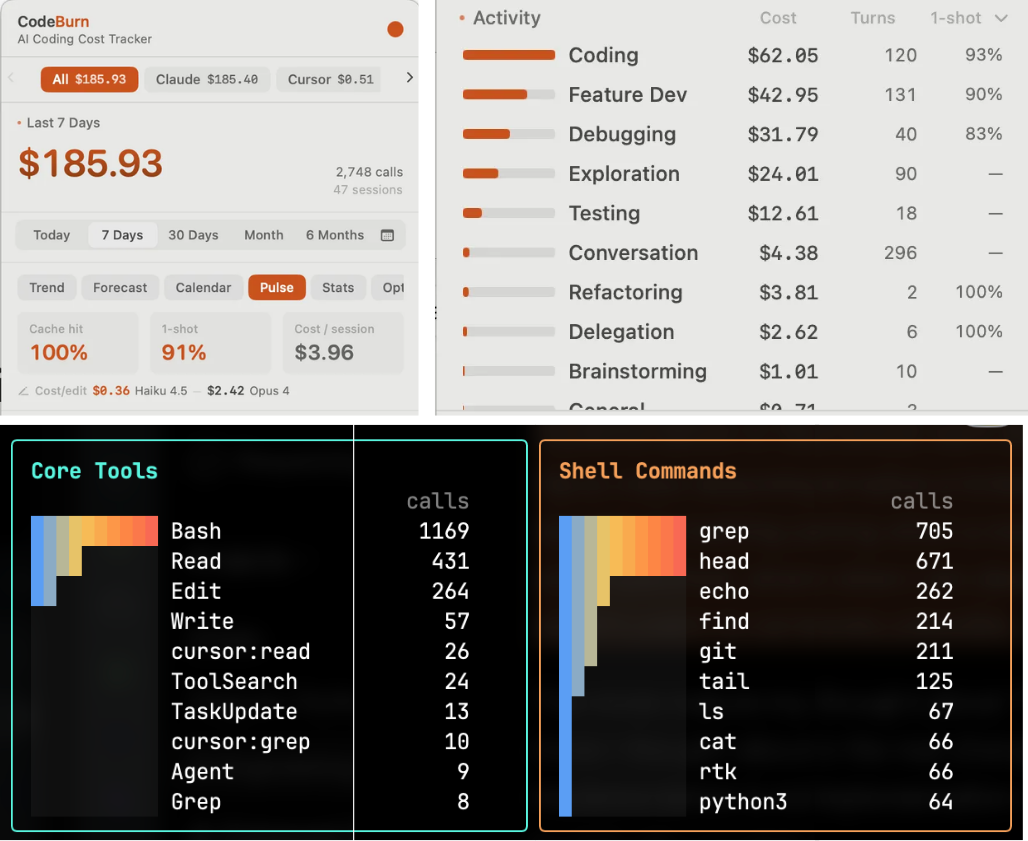
It lets me see where the spend is going, which tools are responsible, and what kinds of tasks are burning the most context.
2.4 Cutting off Tokens
I also recommend installing RTK.
The fastest way to make your sessions expensive is to ignore context discipline.
A normal implementation loop produces a ridiculous amount of noise. If you inspect what Claude is doing when searching through the codebase with CLI commands, you will see it tries to narrow down its searches.
Agents are great for codebase exploration, but still, regardless of how narrow the CLI command Claude generates is, noisy output will still make it into your Agent’s context.
> ls -la src/ | grep <file-name>
Agent sees: (filenames, + date created, + linux file permissions, + file sizes)

> grep -C10 __main__ api.py
Agent sees: (find __main__ in api.py, print surrounding 10 lines)

> pytest ../tests
Agent sees: (test_a PASSED, test_b PASSED, test_c PASSED, test_auth FAILED)
RTK sits between the coding agent and the terminal.

When the agent runs common dev commands, RTK rewrites them through a Rust proxy, executes the original command, compresses the output using command-specific filters, preserves the exit code, and sends a smaller, more relevant result back to the agent.
2.5 Optimizing broader context with Headroom
I also recommend installing Headroom.
Headroom solves a different problem from RTK.
RTK sits close to the terminal. It compresses shell and tool output after commands run. Headroom sits higher up the stack, between the application or coding agent and the model provider. Instead of cleaning command output after the fact, it compresses the broader request context before it reaches the model.
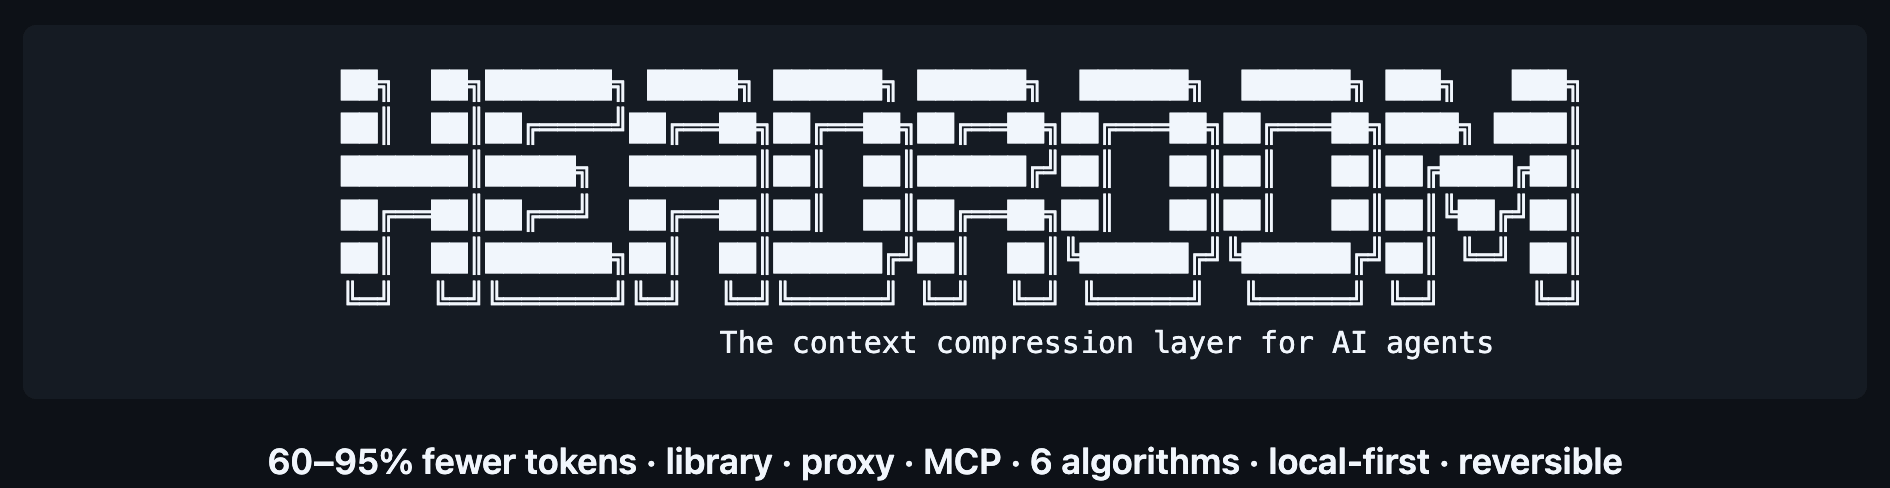
Logs, JSON, search results, plain text, code, and tool outputs are treated differently. It works similarly to a local RAG, caching the original content locally and leaving a retrieval marker, so the model can work from the compressed view first and ask for the original only when it actually needs more detail.
When you install Headroom, you get its MCP Server, the Proxy, and Serena MCP. The more you have it active, Serena will index your entire codebase (similar to an LSP) and retrieve the relevant code snippets and functions to your Agent, instead of dumping entire files into the prompt.
2.6 The point of this stack
The reason I recommend this setup is not that Warp, CodeBurn, RTK, or Headroom is that they fit my workflow.
I want one surface where I can drive the stages, inspect agent behavior, and stay in the loop. I want visibility into token cost, less terminal noise, and less wasted context.
That is why I mostly work this way now.
Are you already using any of these tools? If yes, how do you find them?
3. What I would keep even if the tools changed
First, treat agents as workers inside a system. The runtime can be replaced, but the workflow is the durable asset.
Second, agents can write code, but humans should stay at decomposition and sign-off. Those are the points where judgment has leverage.
Third, route tasks smartly and delegate to appropriate models. You don’t need Opus xHigh reasoning for everything.
Fourth, track token cost like infrastructure cost. Your agent shouldn’t burn money by rereading the repo every time.
Fifth, when working with Agents, prefer a small vertical slice that can be quickly validated. This is easier to control than building the best piece across a horizontal. Code will change, and you don’t want to re-refactor every time.
Sixth, let the Agents write the code, but stay grounded on the key stages where you can manage the direction. Be involved in planning, review, and sign-off stages.
Conclusion
The engineer still owns the system.
The tools will change. The models will change. What lasts is not prompt writing by itself, but workflow design. Agents are good at bounded tasks. They are not the source of engineering judgment.
They might help but should not own the architecture, the review bar, or the decision to ship.
We do.
Agents are good at targeted tasks, but will gladly write you a poem in the middle of designing a new API, if you ask them to.
And the accountability stays here too. If an agent-assisted change causes a Sev3, nobody blames the model. The responsibility sits with the engineer that allowed the change through.
That is why I do not use agents to get myself out of the loop. I use them to make the loop more effective, while staying involved where judgment, architecture, and accountability matter most.
Before Leaving…
I’m an ambassador for MACHINA and RAISE Summit 2026, and I’m looking forward to both for slightly different reasons.
MACHINA, on July 7 at Station F in Paris, is the one I’m especially curious about because it is centered on physical AI. Robotics, autonomous systems, and what happens once AI leaves the screen.
RAISE Summit, on July 8–9 at Le Carrousel du Louvre, is broader and larger. The draw for me there is the density of the room: enterprise leaders, builders, investors, and policy people all in one place.


References
Anthropic. (2026). Overview. Claude Code Docs. https://code.claude.com/docs/en/overview
Anthropic. (2026). Models overview. Claude Platform Docs. https://platform.claude.com/docs/en/about-claude/models/overview
Atlassian. (2026). Use Atlassian Rovo MCP Server. Atlassian Support. https://support.atlassian.com/atlassian-rovo-mcp-server/docs/use-atlassian-rovo-mcp-server/
CodeBurn. (2026). CodeBurn. GitHub. https://github.com/getagentseal/codeburn
GitHub. (n.d.). GitHub MCP Server. https://github.com/github/github-mcp-server
Headroom Labs. (n.d.). Headroom. https://headroomlabs.ai/
Model Context Protocol. (2025). Introduction. https://modelcontextprotocol.io/docs/getting-started/intro
OpenAI. (2025). A practical guide to building agents. OpenAI. https://openai.com/business/guides-and-resources/a-practical-guide-to-building-ai-agents/
rtk-ai. (n.d.). rtk. GitHub. https://github.com/rtk-ai/rtk
Warp. (2026). Warp. https://www.warp.dev/
Razvant, A. (2026, February 12). The Engineer’s Guide to AI-Assisted Productivity. The AI Merge.
https://read.theaimerge.com/p/the-engineers-guide-to-ai-assisted
Images and Videos
All images are created by the author, if not otherwise stated.