

The Engineer’s Guide to AI-Assisted Productivity
Six habits that keep you fast and maintainable. Cursor Rules, Claude Code Skills, Agent Plugins, PR rules, non-nitpicky reviews, hooks, and Daily memory dump with Obsidian.

There are a few things most engineers can probably agree on:
Code is cheap nowadays. Design and Planning is not.
AI without a harness is “stupid” and dangerous.
Hype is for marketing. Engineering ships.
And in this article, I’ll try to provide efficient safeguards for each point mentioned.
The Problem of “Developer Productivity”
Across blogs, and all social media channels, there’s a strange obsession with output measured in volume. New libraries built in a day, AI “building” a Compiler, OpenClaw hype and CEOs claiming they don’t need SWEs and Engineers anymore, everything is written by AI nowadays.
If you’ve seen claims like these, you’re not alone. A large chunk of these claims are either marketing, hype, or people making optimistic claims too soon.
At the core of this obsession, sits a flawed idea: Lines of Code.
AI can spill-out 1000 lines of functionality, or that could be done with 200 lines of smartly planned and engineering design. Both will work initially, but the gap will grow in time and at scale. More code means more surface area. More edge cases. More friction when requirements change.
Software is not written to be done “once”. It’s designed to evolve, that’s why we plan roadmaps, allocate budgets and expect systems to change long after their first release.
This is where the real work has always been. Writing code is not the difficult part, designing, planning and building - always was.
AI and Lines of Code
It’s foolish to think that in a real codebase, quality of the code is about “how many lines you can push”, and there are people boasting they push 10k lines to prod everyday. Lines of Code (LoC) have never been a meaningful productivity metric. At best, they’re irrelevant.
Linus Torvalds (creator and lead developer of the Linux Kernel) once put it bluntly:
“Measuring productivity in LoC is just incompetence. Anybody who thinks that’s a valid metric, is too stupid to work at a tech-company”.
Harsh? Yes. But its also true as good engineering is about reducing complexity, and I think a lot of engineers out there will share that view.
As a concrete example, let’s take this PR.
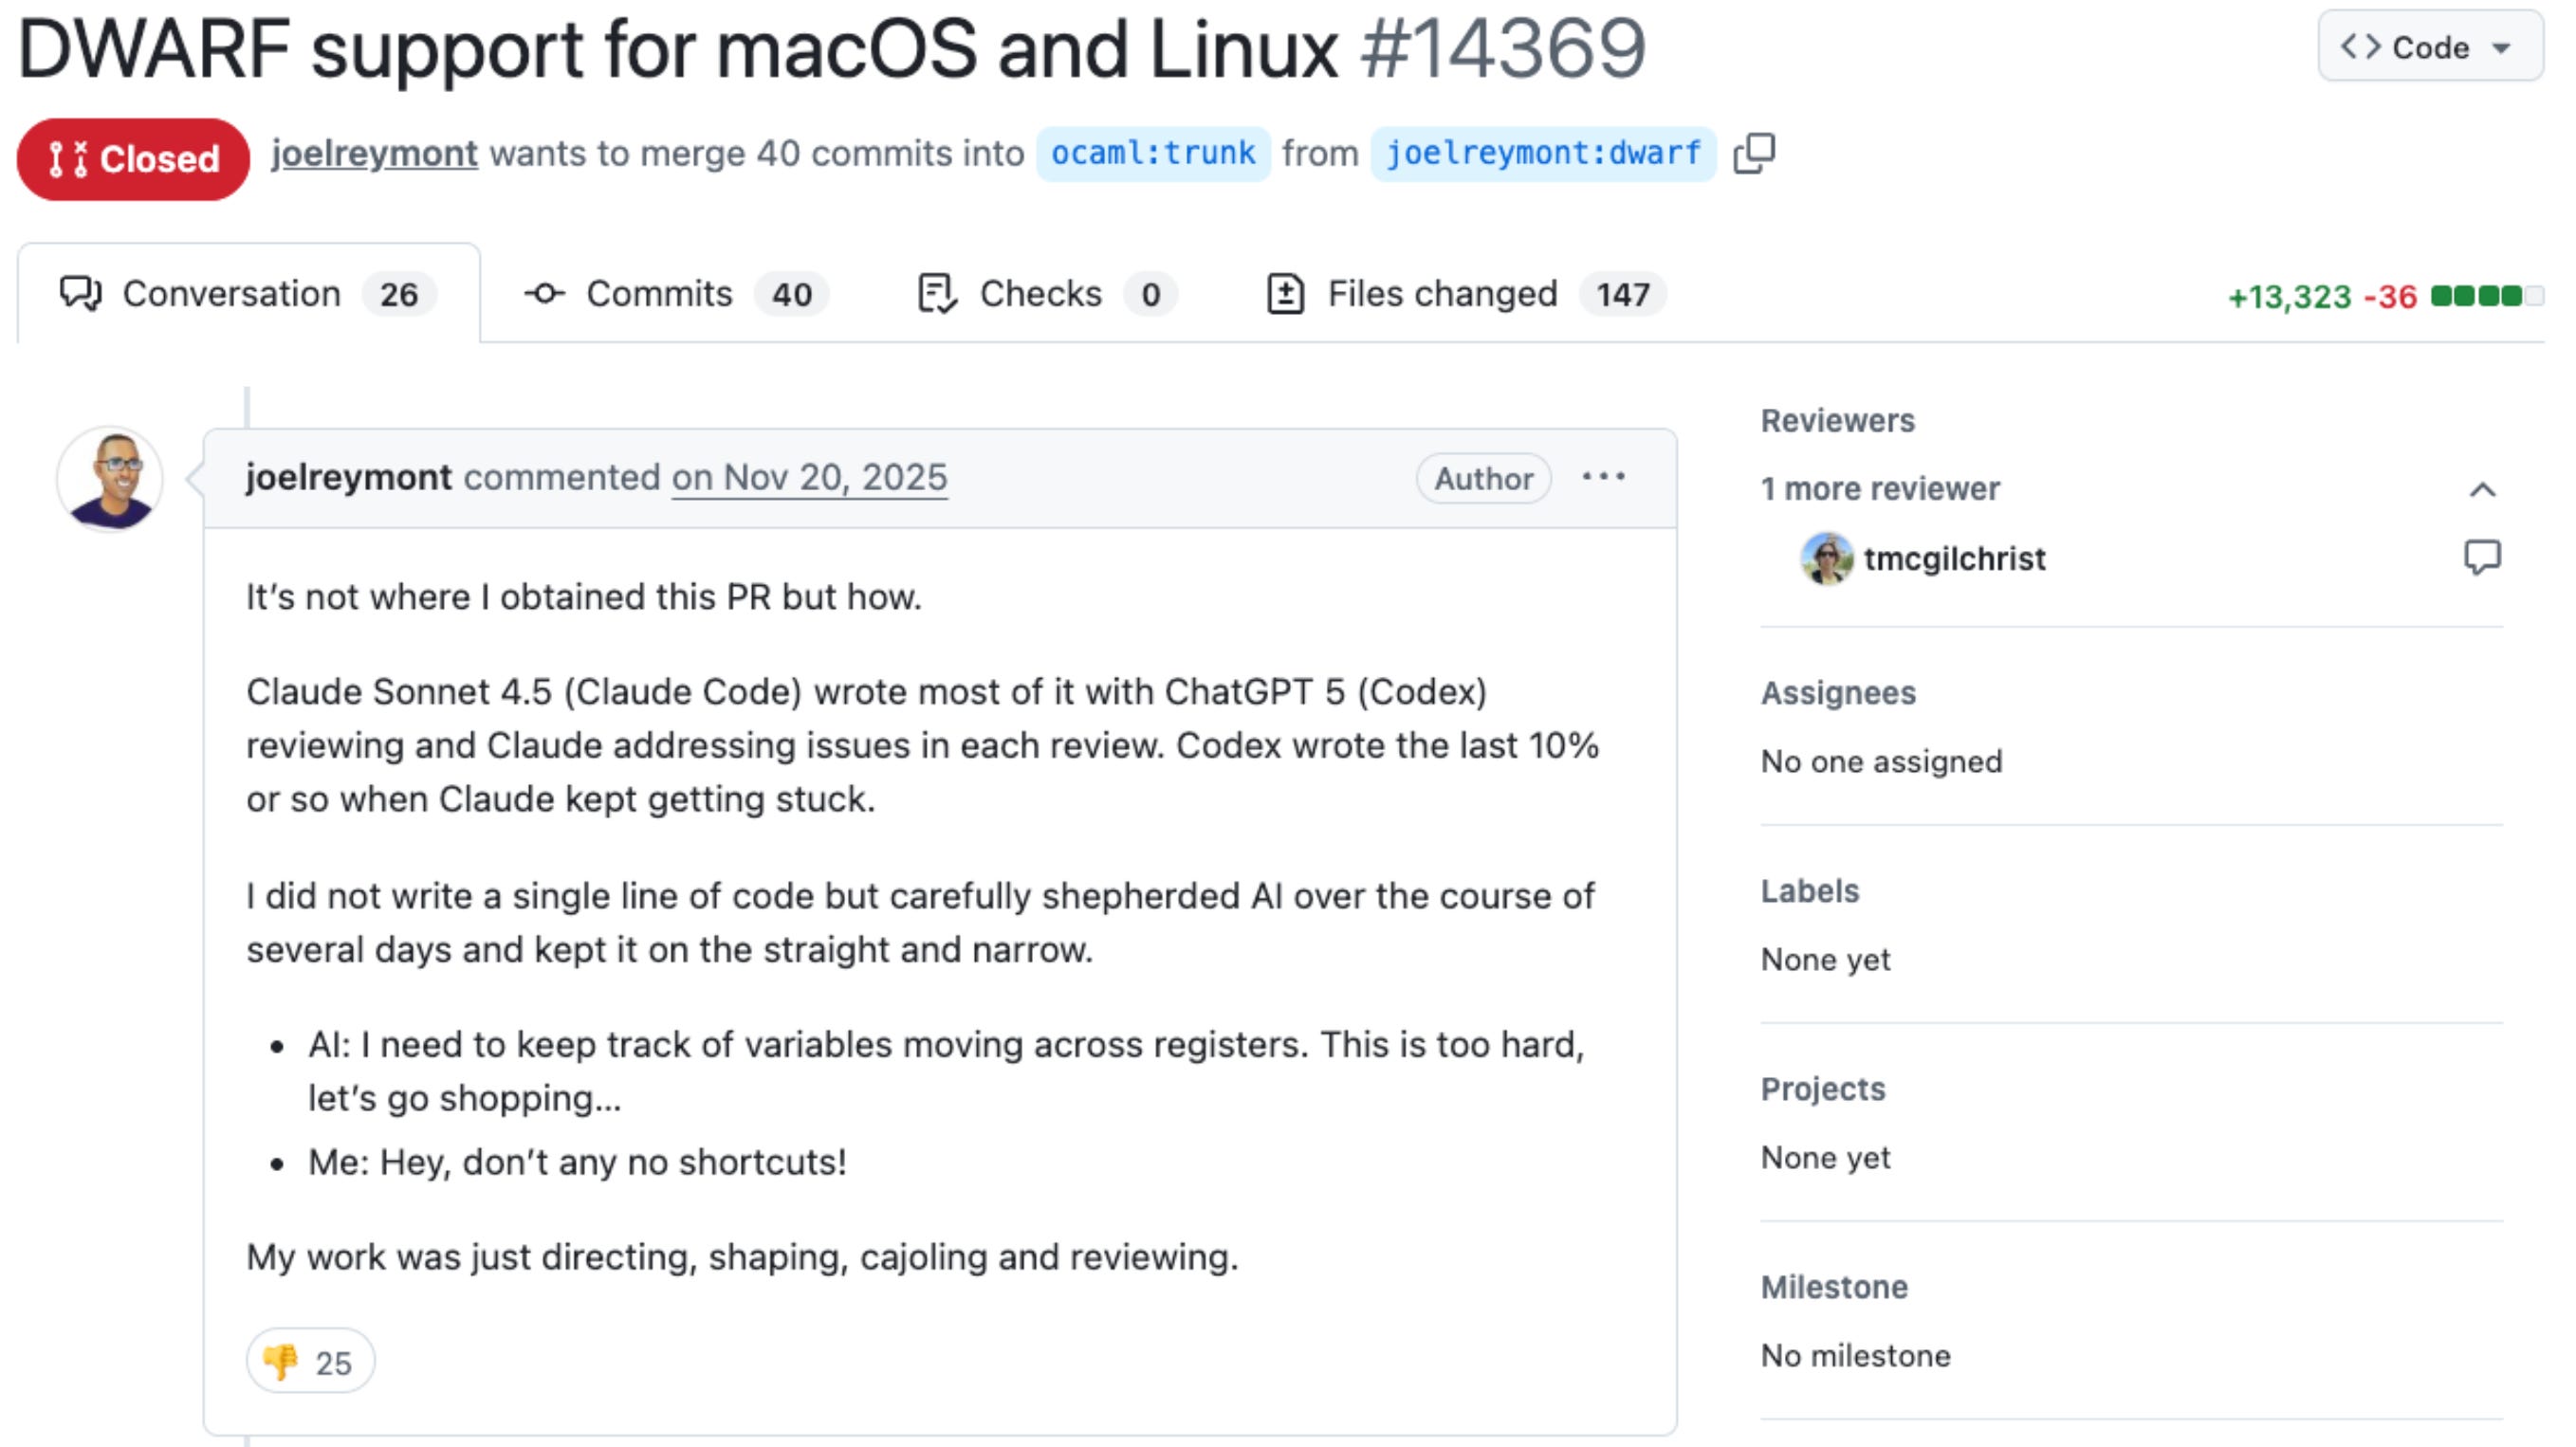
The author, openly admitting he “didn’t write a single line of code”, dumped a 13k LoC fully AI-generated Pull Request, expecting the code owners to review, approve and merge it to the codebase.
That’s wrong and a bad practice that you should avoid. Regardless if you contribute to open-source or work on a codebase, as part of a team.
As an engineer, the important metric you should follow is “ship changes that are consistent and safe to release“. If you can make it fast, on top of that, props to you.
Anyone uses AI to write code, at this point - it’ll be a lie to say otherwise. But if you don’t set constraints, AI will happily produce slop code that’s off-pattern and weirdly expensive to maintain.
So I’m writing this article with that in mind.
Tips, Routines and Advice
In this article, I’ll share the routines and practices that most consistently increase my output as an engineer when using AI - across tooling, workflow, and review.
If you’re not already applying these, you can adopt them quickly - especially if you’re moving fast in a real codebase or collaborating in a larger team.
I’ll break it down into six parts:
How do I get the best out of Cursor IDE
How I use CLI agents (Codex, ClaudeCode)
What I’ve learned on how to treat PRs
Code Review without Nitpicking
Using Squash Commits and pre-commit Hooks
My end-of-day “agent memory dump” workflow with Obsidian (big win)
What “using AI for coding” means in my day-to-day
I don’t treat AI as “the engineer.”
Yes, it can generate code quite quickly, but I still don’t fully trust the outputs and have to check and reiterate to make sure the code does what it’s intended to do. The goal is the right code, in the right shape, that will keep working as the system evolves.
In practice, I like to stay in control of the workflow, especially when juggling shared codebases and multiple moving parts.
I’ve never measured it precisely, but based on day-to-day observation, I tend to keep roughly a 60/40 split between code AI writes and the code I write.
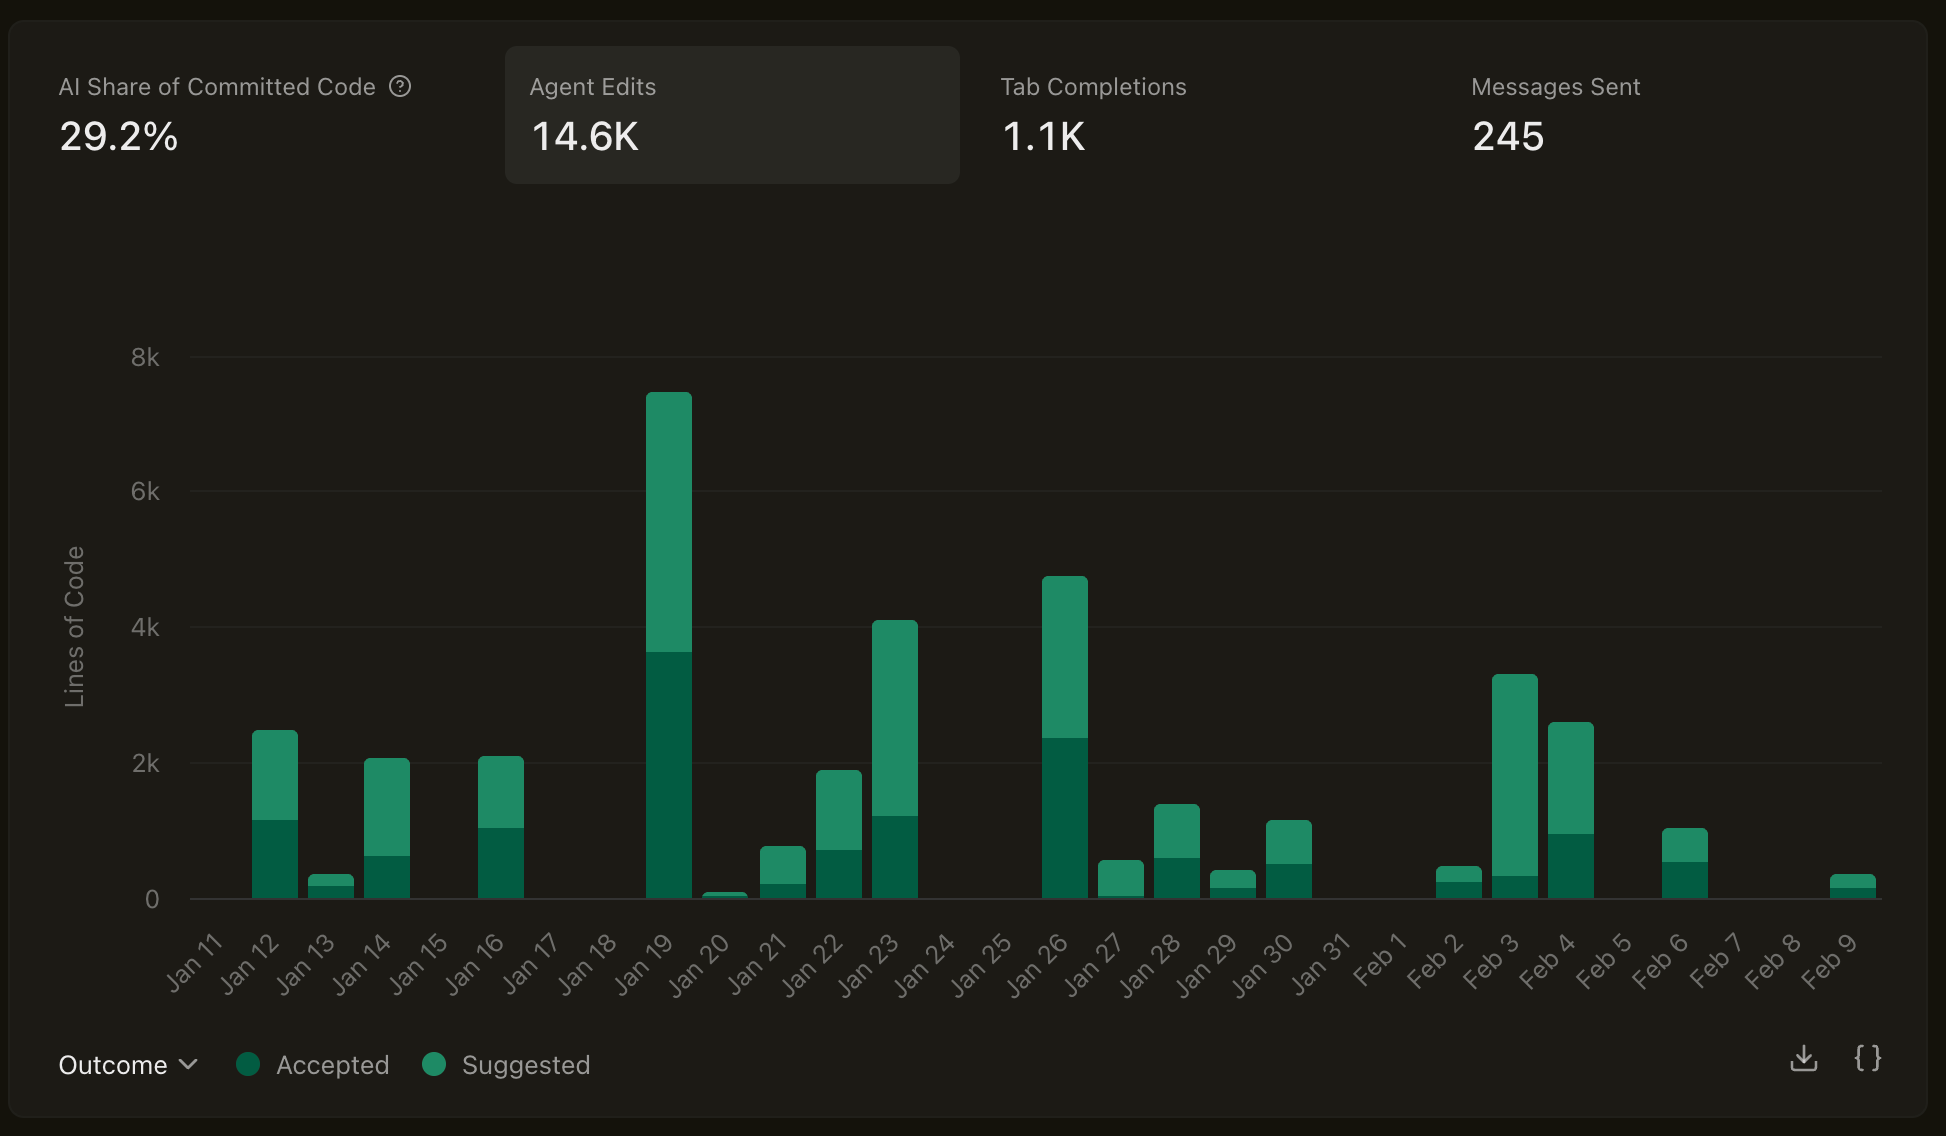
For example, here’s what my Cursor analytics looked like over the past month.
It shows thousands of lines and tokens consumed, but the ratio of accepted changes into my branches is below 50%.
A good rule of thumb, is to treat AI Generated code as “proposed” solution and not source of truth. Don’t accept changes blindly, understand it first.
AI will help me with Design and Planning, and write a lot of the low → mid-low complexity code, which is simpler and more or less repetitive.
All that while I analyse and guide through, or even write the hard-path logic. This aligns with the “plan first” advice you’ll see in most serious guidance around AI coding assistants: generate a plan in read-only mode, then execute it step-by-step.
Tip #1 - Using Cursor And Cursor Rules Standards
Before switching to Cursor, I’ve been mostly using VS Code + Copilot Pro plugin. In my current team, we’re mostly using Cursor Enterprise and Claude Code CLI Agent.
In this section, I’ll describe a few best practices I’m using, that work for me when setting the Cursor IDE with specific repo rules.
What are Cursor Rules?
Think of Cursor Rules as targeted sections of a big system prompt for your Agent.
These are one of the highest-leverage tools you can benefit from working with AI in a real codebase, as it helps the coding agent scope each iteration, or list of TODOs it plans out to map to your actual project requirements.
Cursor supports both .md and .mdc files, but I recommend .mdc (Markdown Components) because it supports frontmatter.
Frontmatter is a block of YAML, JSON, or TOML metadata located at the very top of Markdown files, enclosed by triple-dashed lines (
---), allowing you to add metadata.
For instance, in MDC files, you can specify the path globs **/*.py, to target and apply a rule only to Python files, or filter by folder/subfolder using services/*/*.py to apply a rule to all Python files under services.
Here is a 3-step plan to prepare your Cursor rules:
Keep rules small, or split into multiple files.
Add the rule only after observed failures
Treat rules as guardrails (scope with globs per language, folder, files)
Here’s a minimal example I’m using for my personal projects with Python codebases:
# .cursor/rules/base-python.mdc
---
description: Specific rules for handling scaffolding of new Python packages.
globs: src/**/*.py
---

You are an expert in Python, FastAPI, and scalable API development. The Python components you are building will communicate with other services, particularly Inference Engines.

## Always
- Prefer iteration and modularization over code duplication.
- Follow existing patterns in the codebase. Do not invent new styles or structures.
- If unsure about design or placement, move to Cursor Plan mode and ask before implementing.
- Use descriptive variable names with auxiliary verbs (e.g., is_active, has_permission).
- Don't write summaries, improvement plans, refactoring plans as Markdown files, unless asked.

## Formatting & Style
- Follow PEP 8.
- Assume Ruff formatting by running `uv run ruff format`

## Imports
- Prefer absolute imports, use the isort plugin to sort imports in order.
- Avoid circular dependencies.

## Types & Interfaces
- Use type hints on all function signatures, use the `typing` module.
- Always use Pydantic BaseModels over dataclasses.

## Logging & Errors
- Use structured logging (no prints).
- Log required context (e.g. correlation_id) in API calls.
- Always log error when catching a specific exception, never use bare `except`.

## Testing
- New behavior must include a test.
- Place tests in the `tests/unit` folder of the Python Package.
Rules should be short, targeted and enforceable. Keep the .mdc file light, with one rule per line, as even if your coding agent has up to 200k tokens of context, you don’t want to clutter it or confuse it with complex rules that spawn multiple lines or instructions.
Places where you can find Cursor Rules:
Tip: Don’t copy paste them directly from these sources, but rather customize based on your project needs. Keep the rules targeted and actionable.
Tip #2 - Agent Skills (Claude/Codex)
Apart from Cursor, in my team we’re also using Claude Code, and a few colleagues use Codex, on their personal subscription plan.
In this section, I’ll compare Claude Code with Cursor on how to set them up, and what is different between the two, while also providing a few examples on how you can structure Agent Skills for Claude.
There are two approaches for teaching agents framework knowledge.
First, configuring Agent context at the project root level. (AGENTS.md/CLAUDE.md)
Second, configuring Agent context using modular domain knowledge. (Skills)
AGENTS.md/CLAUDE.md
Targeted at general agents, also compatible in Cursor is a markdown file in your project root that provides persistent context to coding agents. Whatever you put in AGENTS.md is available to the agent on every turn, without the agent needing to decide to load it. Claude Code uses CLAUDE.md for the same purpose.
Agent SKILLS
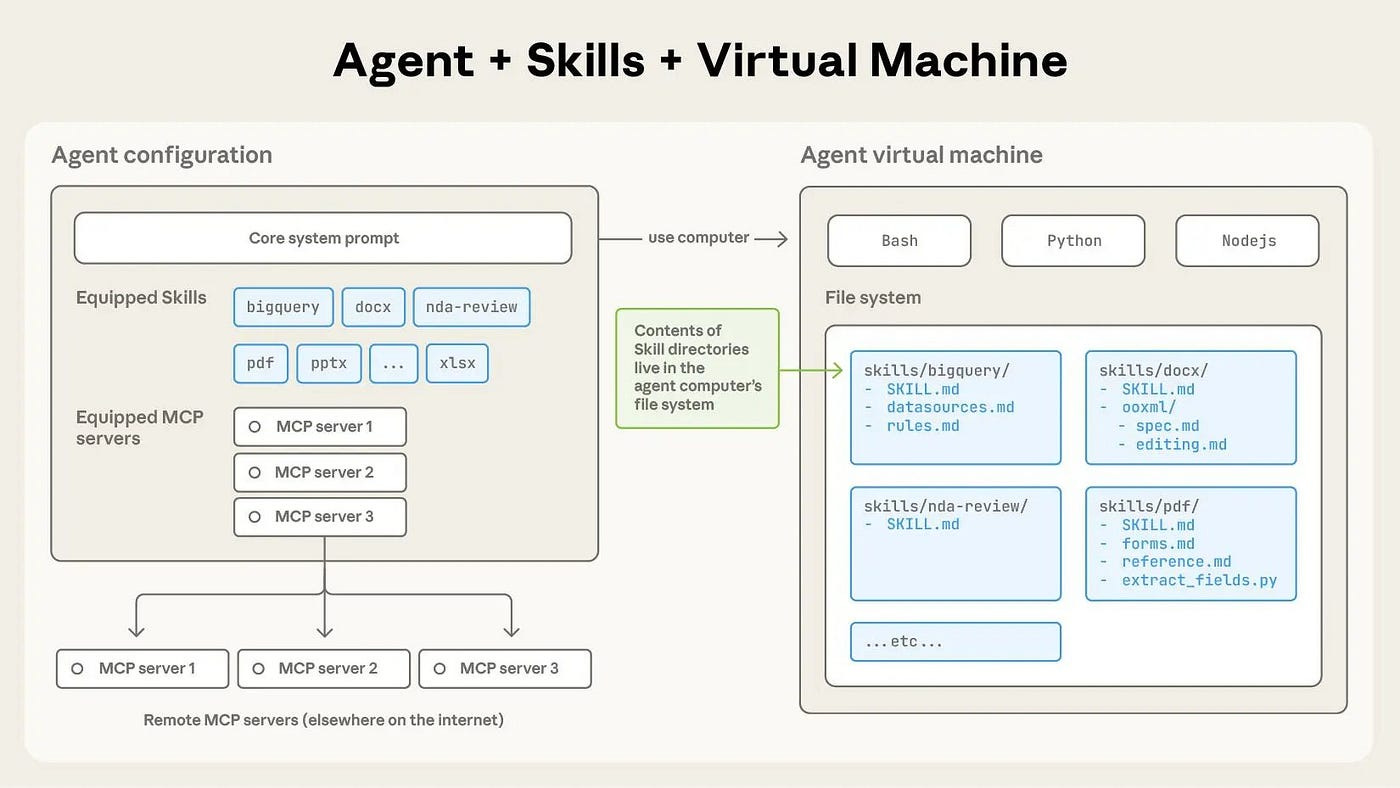
Skills on the other hand, are an open standard for packaging domain knowledge that coding agents can invoke and use. A skill bundles prompts, tools, scripts and documentation that can be invoked on demand, as the Agent sees fit.
Think of Agent Skills, similarly to how an MCP Server works. The concept is similar.
Understanding CLAUDE.md vs SKILLS vs COMMANDS
CLAUDE.md
This is the simplest one, it’s a set of files that get treated as the default prompt for Claude Code, loaded at the beginning of every conversation.
Agent Skills
Skills are better-structured CLAUDE.md files. They are invoked by Claude automatically when relevant (when agent decides to) or invoked manually by the user using
/<skill>. Compared to CLAUDE.md, Skills are more token-efficient, as they don’t glob the Agent’s context with every new session.Slash Commands (In Jan 2026, they were merged with Skills)
Before the merge, these were similar to Skills in the way they’re packaging instructions separately, which also can be invoked by Claude when needed or manually by the user.
In a sense, the difference I see between Command and Skill, is that a Slash command is “intended” to be invoked manually by the user, whereas an Agent Skill should be invoked by the Agent on demand (and not manually)
Agent Plugins
Plugins can be considered as an interface to package skills, slash commands, agents, hooks, and MCP servers together. At any point in time, a plugin doesn’t have to use all of them. Similarly, this can be distributed as a standalone Skill, but the Plugin format makes it easy to install.
Let’s continue with an example of a Skill I’m using on my current project I’m working on. The scope of this skill is to manage the API layer and Database integration, with FastAPI and PyMongo.
The Structure
The standard structure of a Skill is referenced in the official Anthropic’s Skills repository. Each skill has it’s own folder, with a SKILL.md file at the root.
Additionally, a Skill folder could contain helpers and references, such as Scripts that can be executed or small targeted “CLAUDE.MD” files as a reference for the Skill to look-up to.
For instance, here’s my FastAPI-Backend Claude Skill:
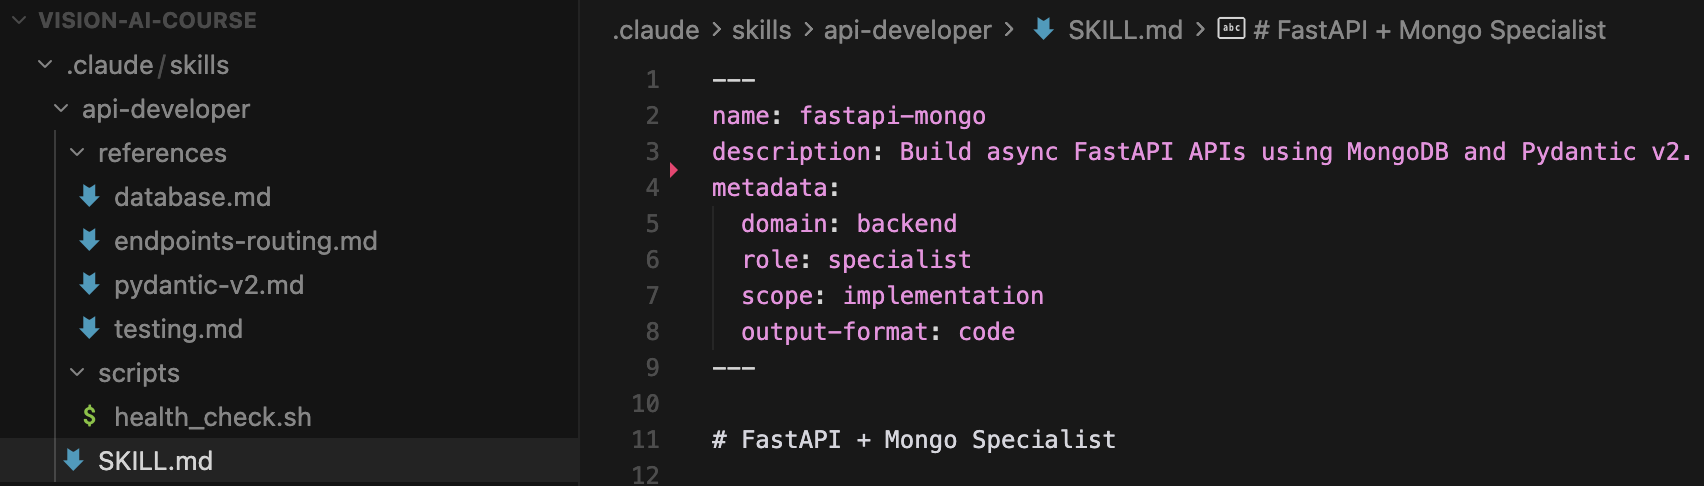
The skill name ‘api-developer’ under the .claude/skills folder.
A ‘references’ folder that contains individual, reference context or “prompts” for the Agent to look-up.
A ‘scripts’ folder where I attach a ‘health_check.sh’ script the Agent could run, if it decides to.
The ‘SKILL.md’ that describes the actual ‘api-developer’ agent skill
I won’t add the contents of each file, but I’ll unpack the core structure of how this Skill is composed, how to tie in references and scripts and its overall instructions and metadata.
The SKILL.md
---
name: fastapi-mongo
description: Build async FastAPI APIs using MongoDB and Pydantic v2.
metadata:
  domain: backend
  role: specialist
  scope: implementation
  output-format: code
---

# FastAPI + Mongo Specialist

You are a senior Python backend engineer focused on **FastAPI**, **Pydantic v2**, and **MongoDB**.

You build clean, async, production-ready REST APIs with strong validation and automatic OpenAPI docs.

## When to Use
- Creating REST APIs with FastAPI
- Defining request/response schemas with Pydantic v2
- Performing async MongoDB CRUD operations
- Structuring small to medium backend services

## Tech Stack
- Python 3.11+
- FastAPI
- Pydantic v2
- MongoDB (Motor / async PyMongo)

## Core Workflow
1. Define Pydantic models for input/output
2. Implement async FastAPI endpoints
3. Perform MongoDB operations using async drivers
4. Return proper HTTP status codes and responses

To verify the API is up (e.g. before running tests or debugging), run `scripts/health_check.sh` from the skill directory (optionally set `BASE_URL`).


## Reference Guide

Load detailed guidance based on context:

| Topic | Reference | Load When |
|-------|-----------|-----------|
| Pydantic V2 | `references/pydantic-v2.md` | Creating schemas, validation, model_config |
| Mongo | `references/database.md` | Async database, models, CRUD operations |
| Endpoints | `references/endpoints-routing.md` | APIRouter, dependencies, routing |
| Testing | `references/testing.md` | pytest-asyncio, httpx, fixtures |
| Health check | `scripts/health_check.sh` | Verify API is up before tests or manual checks |

## Constraints

### Must Do
- Use async/await for all I/O
- Use Pydantic v2 syntax (`model_config`, `field_validator`)
- Use type hints everywhere
- Use FastAPI dependency injection where appropriate
- Validate all incoming data with Pydantic
- Return JSON-serializable responses

### Must Not Do
- Use synchronous MongoDB drivers
- Use Pydantic v1 syntax
- Hardcode configuration values
- Skip schema validation
- Mix sync and async code

## Output Expectations

When implementing features, provide:

1. **Pydantic models**
2. **FastAPI router with endpoints**
3. **MongoDB CRUD helpers**
4. **Minimal explanation**

## Knowledge Scope

FastAPI routing, dependencies, response models,
Pydantic v2 validation and serialization,
Async MongoDB CRUD patterns,
OpenAPI / Swagger auto-documentation
Key Section #1 - Reference Guide
Since I have a ‘references’ folder and I want the Agent to look-up specific instructions for each topic, I tell it where to find the other Markdown files it should look-up, in the References section.
Upon execution, if the Agent is working on building a new Router or FastAPI endpoint, it’ll scan the ‘references/endpoints-routing.md’ file, to load additional context.
For instance, here’s the Pydantic-V2 reference file the Agent could use, which basically contains a few hard references and code examples of using Pydantic BaseModels and built-in validators.
Nothing complex, just hardening the Agent to generate code that follows the pattern.
# Pydantic V2 Schemas

## Schema Patterns

```python
from pydantic import BaseModel, EmailStr, Field, field_validator, model_validator
from typing import Self

class UserCreate(BaseModel):
    email: EmailStr
    password: str = Field(min_length=8)
    username: str = Field(min_length=3, max_length=50)
    age: int = Field(ge=18, le=120)

    @field_validator('password')
    @classmethod
    def validate_password(cls, v: str) -> str:
        if not any(c.isupper() for c in v):
            raise ValueError('Password must contain uppercase')
        if not any(c.isdigit() for c in v):
            raise ValueError('Password must contain digit')
        return v

    @field_validator('username')
    @classmethod
    def validate_username(cls, v: str) -> str:
        if not v.isalnum():
            raise ValueError('Username must be alphanumeric')
        return v.lower()

class UserUpdate(BaseModel):
    email: EmailStr | None = None
    username: str | None = Field(None, min_length=3, max_length=50)
```
## Model Validator

```python
class OrderCreate(BaseModel):
    items: list[OrderItem]
    discount_code: str | None = None
    total: float

    @model_validator(mode='after')
    def validate_order(self) -> Self:
        calculated = sum(item.price * item.quantity for item in self.items)
        if abs(self.total - calculated) > 0.01:
            raise ValueError('Total does not match items')
        return self
```
## Serialization Control

```python
class User(BaseModel):
    model_config = {
        "from_attributes": True,
        "json_schema_extra": {
            "example": {"email": "user@example.com", "username": "johndoe"}
        }
    }

    id: int
    email: EmailStr
    password: str = Field(exclude=True)  # Never serialize
    internal_id: str = Field(repr=False)  # Hide from repr

## Settings (Pydantic V2)

```python
from pydantic_settings import BaseSettings, SettingsConfigDict

class Settings(BaseSettings):
    model_config = SettingsConfigDict(
        env_file=".env",
        env_file_encoding="utf-8",
        case_sensitive=True,
    )

    DATABASE_URL: str
    SECRET_KEY: str
    DEBUG: bool = False
    CORS_ORIGINS: list[str] = ["http://localhost:3000"]
    API_V1_PREFIX: str = "/api/v1"

settings = Settings()
```

## Quick Reference

| V1 Syntax | V2 Syntax |
|-----------|-----------|
| `@validator` | `@field_validator` |
| `@root_validator` | `@model_validator` |
| `class Config` | `model_config = {}` |
| `orm_mode = True` | `from_attributes = True` |
| `Optional[X]` | `X \| None` |
| `.dict()` | `.model_dump()` |
| `.parse_obj()` | `.model_validate()` |
Key Section #2 - Harness (DOs and DONTs)
These are helpful in making the Agent not repeating the same mistakes, and enforcing rules. Usually, under this section you’d put the pathways an Agent must follow, after you noticed its drift during the Agent’s coding session.
Key Section #3 - Scope
This is an additional small but helpful section, where you could add more details that’ll help Claude Code decide if this skill is the appropriate one to be used.
There are a lot of Claude Code Skills examples out there, from ones that target Programming, to drawing Design Sketches or planning trips. I’ll attach a few sources from where you can find and adopt Claude Skills, programming focused.
Resources for Claude Skills:
My recommendation is to customize a Skill for your codebase.
Avoid integrating Skill as Copy/Paste, and don’t install untrusted Plugins.
Tip #3 - How to treat PRs
The philosophy is simple here: include enough details in a PR while avoiding cluttering or bloating it. With each feature, fix or bug issue I worked on, I usually follow these 3 steps before raising a PR:
Attaching the Ticket
Attaching the 1-pager Design Doc link (for major changes)
Attaching short one-two paragraph descriptions of what the PR does.
In my team, we have a standard to follow, where we keep PRs light in details, covering only the core paths one would need to know in order to be able to review the code changes.
I would lie if I said I didn’t have PRs with 1000+ lines of code.
That slowed us down a lot, both in my output speed, having to address multiple comments and on the reviewer’s time as nobody can intake and reason on how multiple changes will impact the codebase.
If there’s too much detail to be covered, I double-down on using block or sequence diagrams that outline how the change impacts the overall behaviour, and I put these diagrams in a 1-2 pager doc, and attach the shared link in the PR.
When a team member is doing code review, he’ll usually follow these steps:
Read the short description of the PR
Go to the design/pager doc for details and understanding context
Review the code
We also use GitHub Copilot with common rules for Code Review, that we’ve set at the GitHub Organization level, to flag major issues only, and specifically avoid nitpicks.
A PR Body Example
// PR Title: feat(PRJ-002): Parallelize embedding generation through worker pools

## Track
Ticket: PRJ-002
Design (optional): <link-to-1-page-doc>

## Description
This PR implements the queue payload and parallelizes the vector embedding fill through a pool of workers. The configuration parameters are defined in configs/worker.yml.

During the API call for generating embeddings (v1/embed), the workers will spawn as background tasks, compute embeddings, log statuses per `worker_id` and basic telemetry data.

## Notes
For testing, use `make test-local` with the UV environment activated, or `make test-docker` to spawn a local docker container with mock data.
Although there are use cases when PRs transform into small threads this approach optimized the time spent reviewing or explaining design decisions.
The base idea is, provide the minimal required context (description, diagrams, decisions) upfront, such that the person reviewing will get a good enough picture of what he’s supposed to review and look at.
Three more important aspects
Keep your PRs light, target one fix, one feature. Don’t flex in Lines of Code.
I add proper CI stages in Github Actions workflows (lint, test and code-coverage)
In a PR, if Copilot flagged an easy fix, I raise an issue and assign it to Copilot.
Tip #4 - Code Review without Nitpicking
I won’t sugarcoat this.
Early in my career, I reviewed PRs like a grumpy linter.
I used to flag every optimization I could find around performance, code structure or asking for more documentation. I used to think that because I’ve seen more systems made me an authority on keeping things clean and right.
What I actually did was slow the team down.
The good thing: I learned from it.
The bad one: I learned a bit late.
A good review is a lever. It nudges the team toward better outcomes without blocking delivery.
If you’re at a point in your career where you can improve this, do it now. It compounds.
Focus on what will cause real pain later: correctness, security, reliability, maintainability. Save style and “nice-to-haves” for follow-ups (or a separate PR). I could summarize the plan I’m following at the moment into three parts:
Identify the issue (what and where)
Provide a solution (a concrete alternative)
Explain impact and offer to help (why it matters downstream)
A few examples of DOs and DONTs
Dataclass introduced when repo uses Pydantic
❌ Don’t: “Use Pydantic, as dataclasses aren’t used in our code”
✅ Do: “The <name> is a dataclass and it uses custom validators under tools/validations.py. Let’s try to make it a BaseModel and benefit from model_validator hook in Pydantic. That will keep the model + validations in the same file, which is easier to navigate and reduces LoC”
Using hardcoded values or magic numbers
❌ Don’t: “Please remove the hardcoded ttl_backfill_sec = 10”.
✅ Do: “I think it’ll be better if we surface ttl_backfill_sec into the application config. Leaving it as is, would imply a new release + deployment, compared to injecting it into ENV and restarting the existing service. A second option, in case it won’t change often, is to move it to common/constants.py, we might want to re-use it in multiple places.”
PII sent to the LLM
❌ Don’t: “Be careful with sensitive data.”
✅ Do: “This call will hit the MCP and return user data emails/phone numbers. Please consider adding a PII redaction step before calling the model, we could use a Pydantic BaseModel, with a redact_pii() that obfuscates the fields before the LLM call”
You should always focus on critical parts that will turn-out bad downstream, and leave improvements, styling and guides for later. Always try to provide a solution to support your comment, be it code, a short snippet of documentation or design documents.
Tip #5 - Using Pre-commit + Squash Merges
I use pre-commit locally and enforce the same checks in CI, although some are repeating, that gives me consistent code quality and fast feedback before I even raise my PR.
Here’s a real example.
On one codebase, we use Protobuf to define API contracts shared across multiple services. Some services are in Go, and any time I add a new RPC or deprecate a field - the .pb.go files have to be regenerated.
The problem I encountered is: I’d update the .proto files, forget to run the generator, and end up with this annoying drift where .proto files are correct but .pb.go files are outdated.
CI would catch it, but only after I pushed and waited for a GitHub Action to fail.
Adding a pre-commit hook for proto generation, fixed it before reaching CI and wasting a CI run on GitHub.
Basic .pre-commit-config.yaml example:
repos:
  - repo: https://github.com/psf/black
    rev: 24.10.0
    hooks:
      - id: black
  - repo: https://github.com/astral-sh/ruff-pre-commit
    rev: v0.6.9
    hooks:
      - id: ruff
        args: [--fix]
  - repo: https://github.com/pre-commit/pre-commit-hooks
    rev: v4.6.0
    hooks:
      - id: end-of-file-fixer
      - id: trailing-whitespace
One more important aspect
When pre-commit reformats files and updates generated code, you often end up with a few “noise commits” like:
“fix lint”
“regenerate protos”
“format, wip”
Using squash merges keeps your main branch clean by turning that whole PR into one readable commit with a clear change narrative.
A Squash commit, will register as a single merge commit to your target branch (e.g main).
Say you have 30 commits made during your work on a feature - you don’t want all that history to be added to your main work tree. Squash all the PR commits into a single, clear and readable commit to summarize what the fix or feature PR does.
In my case, I don’t dump the whole commit log into the squash message box. I write one clean message that describes the PR like, similar to a “manifest.json”.
❌ Bad example:
// By default, Git will paste all the PR commit history in the message box.
* feat: add queue payload + worker entrypoint
* feat: add vector store upsert interface
* feat: add metrics + correlation_id propagation
✅ Better example:
This feature implements queuing of embedding_generation tasks, and assigns them to a pool of workers.

Added `metrics.py` to monitor worker progress and logs and keeps track of the request's correlation_id.
You could use AI to generate and/or summarize the commit history of your PR in a compact message that you add as the Squash Commit message.
Tip #6 - EoD Memory and Context Dump
I’m giving a golden tip here.
I work on multiple codebases at the same time. AI enables me to do that.
Everything runs smoothly as long as I’m inside deep focus windows. In a 1–2 hour sprint, I can code nonstop, iterate on multiple features and fixes, and steer multiple agent threads in parallel (Cursor + CLI).
However, I’ve noticed that once I take a break, I need a buffer to get back to the usual routine of understanding where I left, what I was working on and what were the next steps.
That “context reload” is manageable during the work day.
But I’ve found it extremely difficult, taking on and continuing to work the next day, as it usually takes time to regain the entire context from the day before.
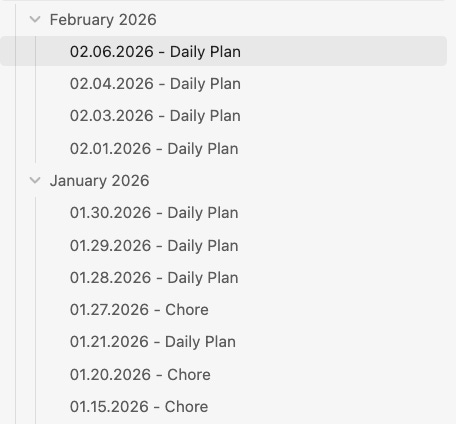
So, I have a trick up my sleeve: an end-of-day memory and context dump.
My Routine
Whenever I’m ready to call it a day, I ask every agent session I touched (across Cursor or the CLI) to produce a short, structured summary, essentially a “handoff note” to my tomorrow-self.
I store each summary locally as:
“memories/[dd-mm-yyyy]-[agent-scope].md”.
Max ~1 Page
Bullet points only
No rich descriptions or narrative
Let’s go through a real example. I might have:
Agent session: Building FastAPI endpoints
Agent session: Infra stack + Docker Compose profiles
Agent session: Integrating Triton inference server endpoints
Agent session: Telemetry during inference
The prompt I’m using to summarize agents sessions is a custom version of the Claude’s /compact prompt:
Your task is to create a detailed summary of the conversation so far, paying close attention to the user's explicit requests and your previous actions.
This summary should be thorough in capturing architectural decisions that would be essential for continuing development work without losing context.

Before providing your final summary, wrap your analysis in <analysis> tags to organize your thoughts and ensure you've covered all necessary points. In your analysis process:

1. Chronologically analyze each message and section of the conversation. For each section thoroughly identify:
   - The user's explicit requests and intents
   - Key decisions, technical concepts and code patterns
   - Specific details like file names, function signatures.

2. Double-check for technical accuracy and completeness, addressing each required element thoroughly.

Your summary should include the following sections:

1. Primary Request and Intent: Capture all of the user's explicit requests and intents in detail
2. Key Technical Concepts: List all important technical concepts, technologies
3. Files and Code Sections: Enumerate specific files and code sections examined, modified, or created. Pay special attention to the most recent messages and include full code snippets where applicable and include a summary of why this file read or edit is important.
4. Problem Solving: Document problems solved and any ongoing troubleshooting efforts.
5. Pending Tasks: Outline any pending tasks that you have explicitly been asked to work on.
6. Current Work: Describe in detail precisely what was being worked on immediately before this summary request.
7. If there is a next step, include direct quotes from the most recent conversation showing exactly what task you were working on and where you left off.

Here's an example of how your output should be structured:

<example>
<analysis>
[Your thought process, ensuring all points are covered thoroughly and accurately]
</analysis>

<summary>
1. Primary Request and Intent:
   [Detailed description]

2. Key Technical Concepts:
   - [Concept 1]
   - [Concept 2]
   - [...]

3. Files and Code Sections:
   - [File Name 1]
      - [Summary of why this file is important]
      - [Summary of the changes made to this file, if any]
      - [Important Code Snippet]
   - [File Name 2]
      - [Important Code Snippet]
   - [...]

4. Problem Solving:
   [Description of solved problems and ongoing troubleshooting]

5. Pending Tasks:
   - [Task 1]
   - [Task 2]
   - [...]

6. Current Work:
   [Precise description of current work]

</summary>
</example>

This should help me gain a fresh perspective on the progress and work being done.
Please provide your summary based on the conversation so far, following this structure and ensuring precision and thoroughness in your response.
Then, I read each of these one-pagers, and move to my Obsidian board, create a note for the next day, and manually write the things I consider important.
That way, on the next day - I’ll have a minimal, fresh view of everything done yesterday. It helps me:
During the Daily Standup - giving a status overview of what I’ve done
Design Meetings, explaining decisions
Composing the PR details
Quick refresh to continue from where I’ve left
Now I have a clear image of what I need to do, and if i need more info, I go back to that specific Agent memory I saved locally in the memories folder re-read the richer context and start working.
That’s a golden nugget! Helps a lot!
Closing Thoughts
If you’re using Cursor:
Customize the rules for your own codebase.
Don’t copy/paste rules from somewhere, without checking first.
Keep the
rules/<rule_name>files light, under 500 LoC.Keep the rules to 1 per line.
Favor using the Plan mode in Cursor first, before the Agent mode.
Switch from Agent Mode to Ask mode whenever asking questions.
When the context of your Agent is closing to full, opt for a memory-dump to save the most important details from that session.
If you’re using Claude Code or Codex:
Try using CLAUDE.md first, before Skills.
When building a Skill, keep it light, and provide small, actionable instructions.
When creating a Skill, follow the official Anthropic template
<skill_name>SKILL.MDreferences/
If a Skill might require executing code, create a Script for that workflow, and place it under the
/scriptsfolder.If there are complex behaviours or patterns you want the Agent to follow, place them as Markdown files under
references/and link them in your SKILL.mdAdapt Skills for your own context and codebase.
Other Tips:
Keep PRs small, well-described, and review with “issue → solution → impact”.
On EoD, opt for doing a daily “agent memory dump” of your Agent session, to quickly summarize the context of the work you’ve done.
Summarize the memories, and prepare a plan for the next-day of work using notes to keep momentum.
I strongly believe this will help you get up to speed when using AI for coding tasks, and will make you a better engineer overall.
Would love to hear your thoughts 💬
How are you using AI in your day-to-day developer workflow?

Awesome post! Have you tried the Compound Engineering plugin? For structured AI-assisted development via CLI.
And have you tried using AI code review tools like Qodo for surfacing high signal insights in your PRs?